Everything you can do to a cycle, from creating one to canceling it.

Create cycles

You can create a cycle order on a customer’s behalf from the Supercycle admin. Supercycle builds a Shopify draft order for you to take payment on.
An in-app create order flow is in beta. It’s described on Create cycle order under the New create order flow beta feature.
1

Open Cycles

Go to Cycles and select Create cycle order.
2

Pick or add a customer

Supercycle asks who the order is for before it opens the Shopify draft order. Search for a Shopify customer by name or email and select them. If they don’t exist yet, select Add new customer and enter their first name, last name, and email. Email is required.
The customer picker searches every customer in your Shopify store, not only the customers already synced to Supercycle.
3

Continue to the draft order

Select Continue. Supercycle creates a Shopify draft order for the customer you selected.
4

Add a product

Search for the product, select its cycle method, and for a calendar rental select the rental period and dates. Supercycle checks the item’s availability. Add more products if the order needs them.
5

Save to the draft order

Select Save. Supercycle adds the cycles to the Shopify draft order.
6

Customize the draft order (optional)

On the draft order, apply discounts, add shipping, or add tags and a note.
Adding a product directly on the draft order doesn’t create a cycle for it. Add cycles from Supercycle.
7

Take payment and create the order

Select Collect payment to mark the order as paid or enter card details, or tick Payment due later. Then create the order. The order appears in Shopify, and its cycles appear on Cycles.

Find cycles to fulfill

Find the cycles due to go out from the Cycles table, or find their orders in Shopify.
1

Open the Cycles table

Go to Cycles. The Unfulfilled tab lists every cycle that hasn’t gone out yet.
2

Filter to today

Select the search and filter icon, open Expected fulfillment date, and select Today.

Open the filters, then set Expected fulfillment date to Today.

1

Open Orders

Go to Orders.
2

Filter to unfulfilled cycle orders

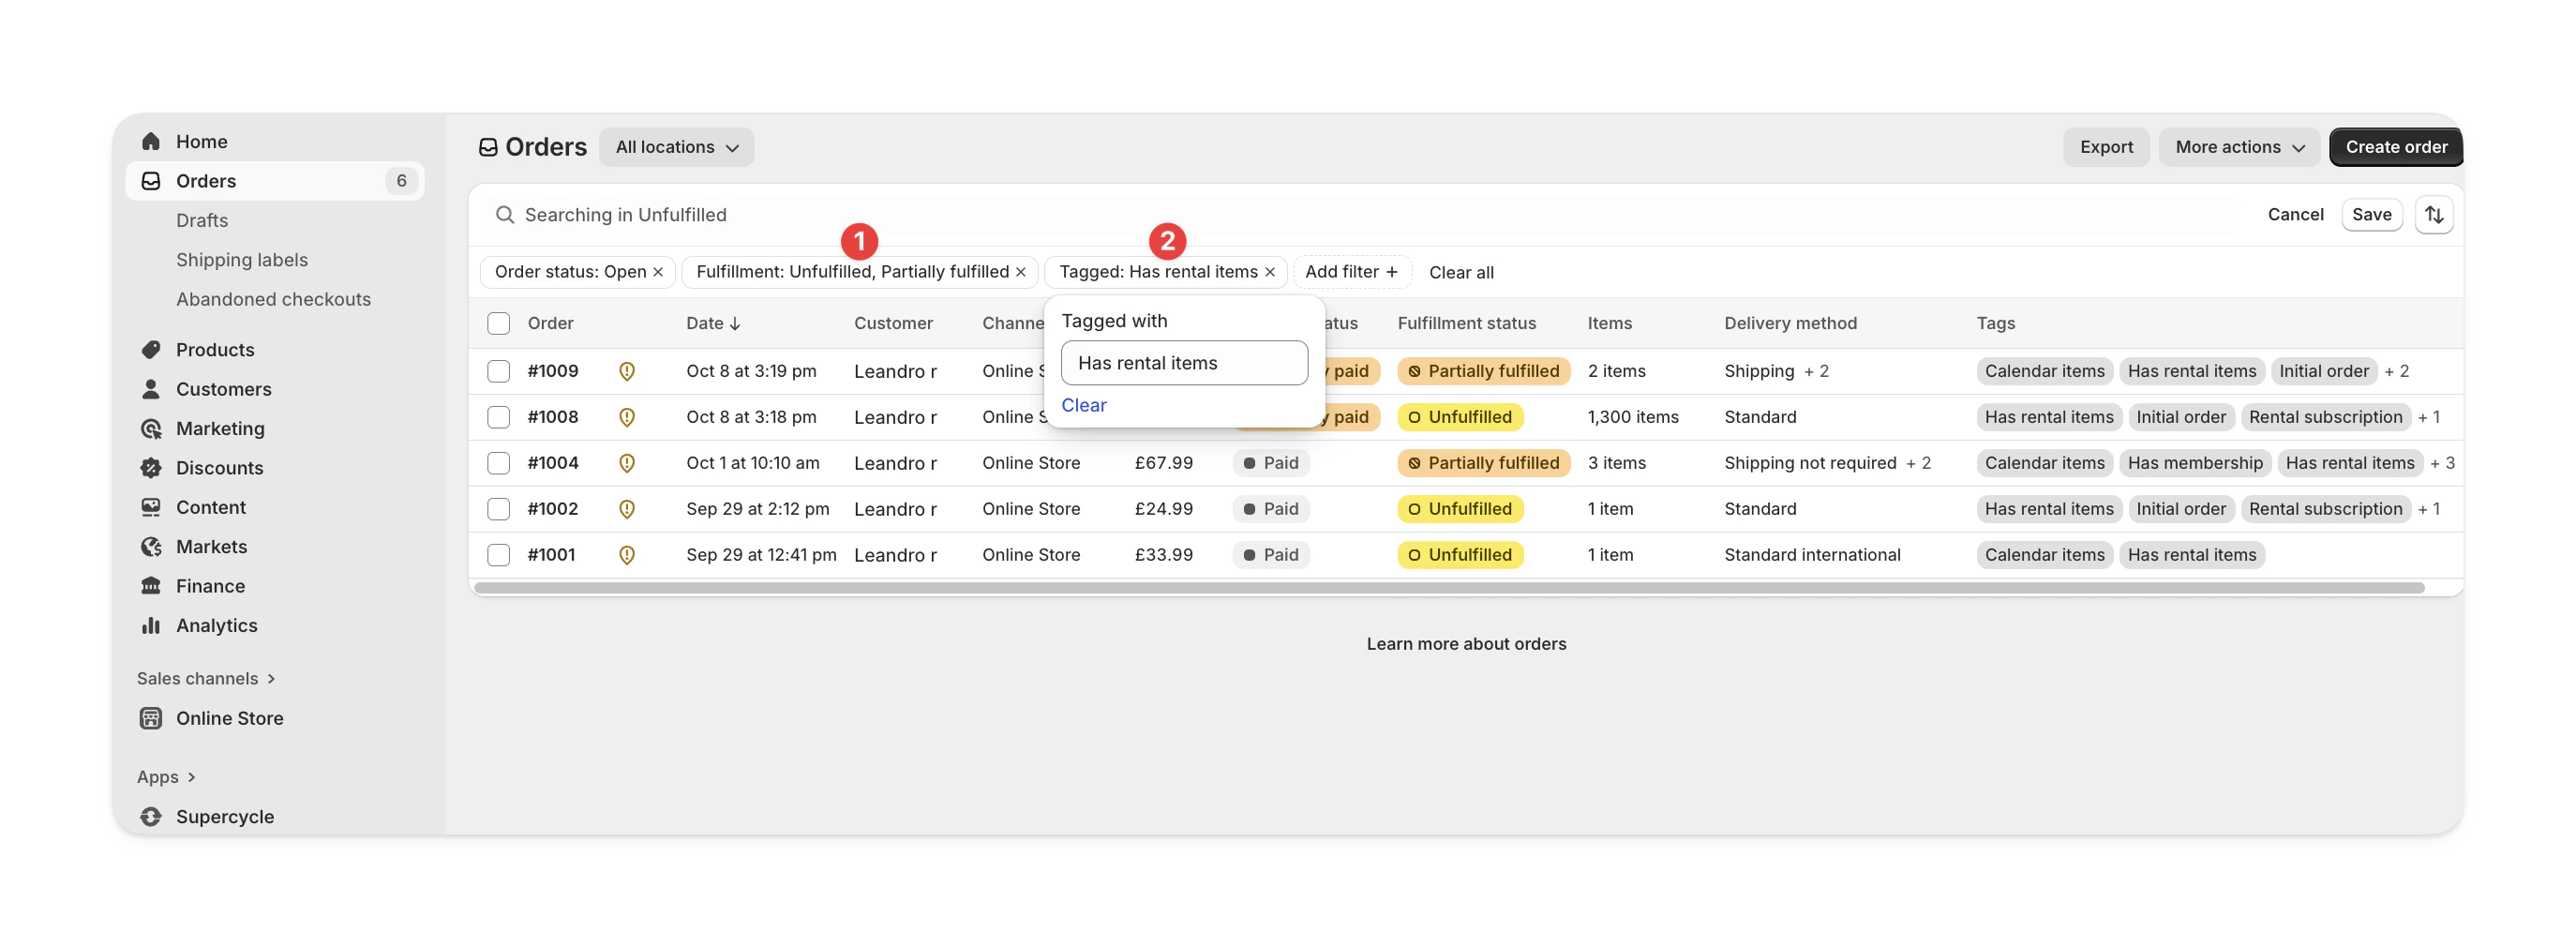
Set Fulfillment status to Unfulfilled and Tagged with to Has rental items. Supercycle adds that tag to every order that contains a cycle.
Shopify's Orders list filtered to open, unfulfilled orders with the Tagged with filter set to Has rental items

Unfulfilled orders tagged Has rental items

Use the list_cycles tool with:
  • status: to_fulfill
  • packing_status: pending, printed, or packed
Use the List all cycles endpoint with the status and packing filters.

Fulfill the order

Fulfilling the Shopify order is what fulfills its cycles. When the order is fulfilled in Shopify, Supercycle sets each of its cycles to Fulfilled.
Marking cycles as fulfilled on the Cycles table updates the cycles in Supercycle only. It doesn’t fulfill the Shopify order, so fulfill the order in Shopify as well.
1

Select the cycles

On Cycles, tick the cycles to fulfill.
2

Mark as fulfilled

Select in the selection bar, then Mark as > Fulfilled. The cycles’ status changes to Fulfilled.

Tick the cycles, open the ... menu, then select Mark as > Fulfilled.

1

Open the order

On Orders, select the order to fulfill.
2

Fulfill the items

In the Unfulfilled card, select Fulfill items. Add a tracking number and carrier if you have them.
3

Send shipment details (optional)

Tick Send shipment details to your customer now to email the customer the tracking information.
4

Confirm

Select Fulfill items. Shopify marks the order Fulfilled and Supercycle sets each of its cycles to Fulfilled.
Use the update_cycle tool with:
  • id: the cycle ID, for example SC-1234
  • fulfilled_at: the fulfillment date as YYYY-MM-DD
Use the Update a cycle endpoint with the fulfilledAt parameter.
Shipping labels are created on the Shopify order.
1

Open the order

On the cycle page, select View order to open the Shopify order. You can also open it from Orders.
2

Create the label

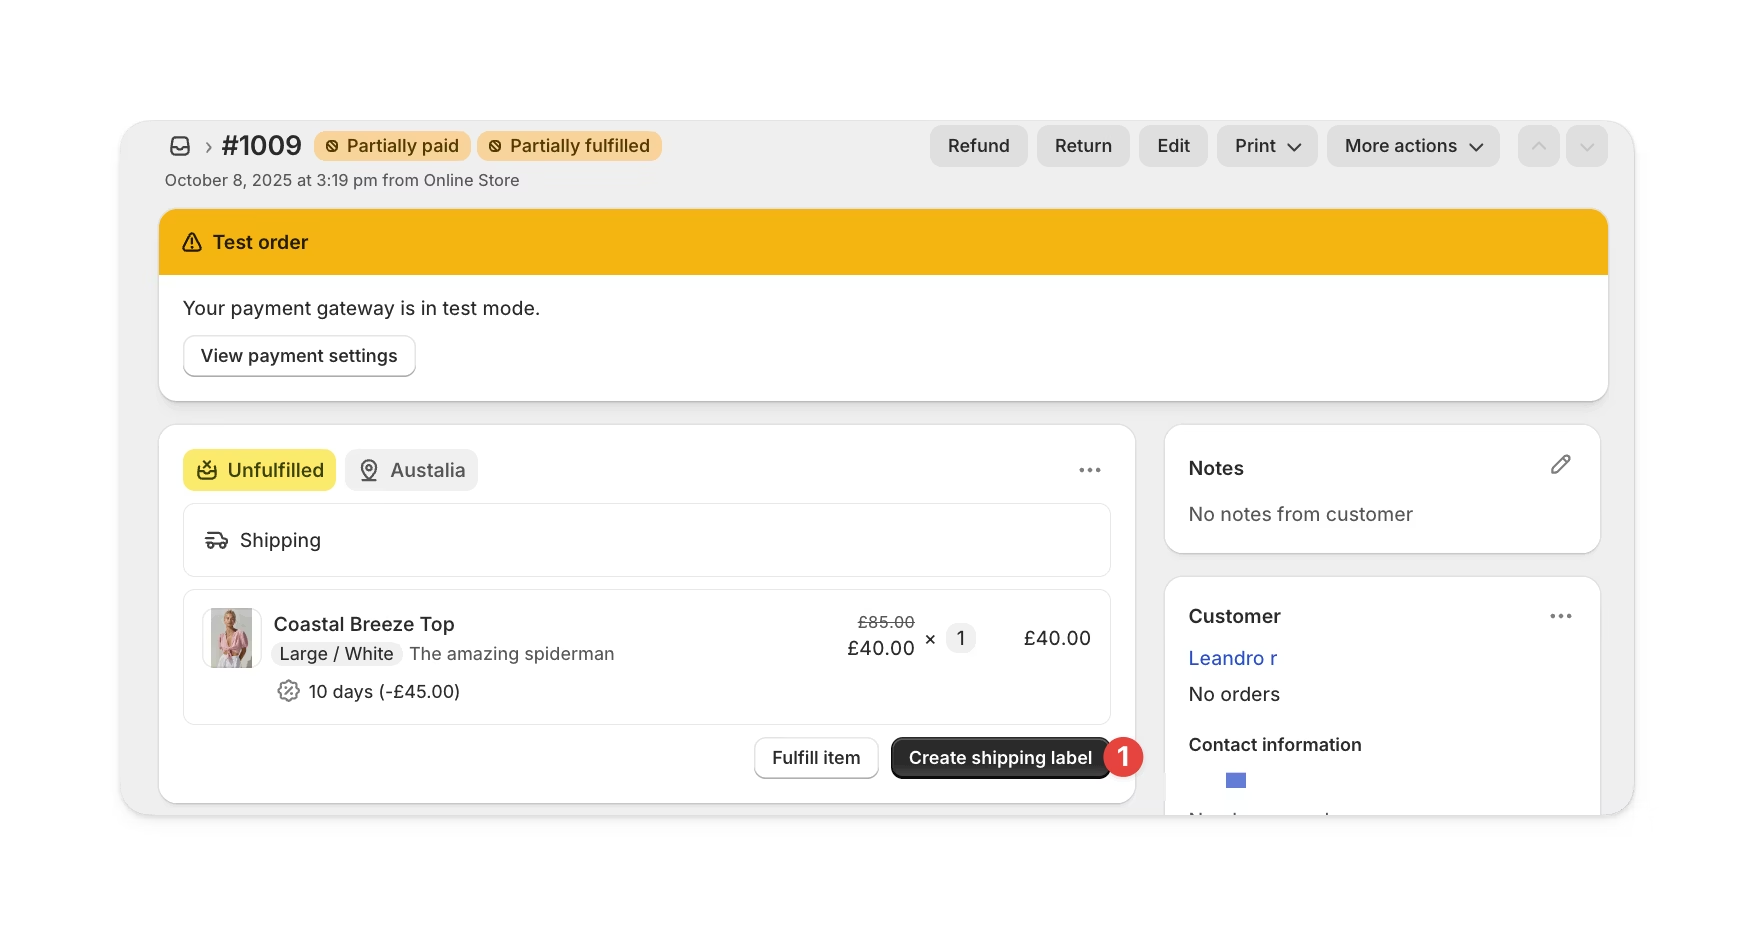
In the Unfulfilled card, select Create shipping label and follow Shopify’s steps to buy and print the label with Shopify Shipping.
A Shopify order's Unfulfilled card for a Coastal Breeze Top cycle with the Create shipping label button

Create shipping label on the order's Unfulfilled card

If you use a third-party shipping tool such as ShipStation, print the label there and add the tracking number to the Shopify order.

Change item

Swap the item allocated to a cycle for another item of the same product.
The item picker shows every candidate item with these columns:When consignment is enabled, Consignor and Revenue share columns show who earns from the cycle and how much.
1

Open Change item

On the cycle page, select Change item on the method card.

Select Change item, pick the new item, Select item, then Save.

2

Select the new item

Search by product or variant name, or by item ID or serial, then select a row or tick its checkbox. Select Select item.
Supercycle limits how many items the search returns. If the item you’re looking for doesn’t show, add more of the serial or product name to narrow it.
3

Save

Select Save in the save bar.
1

Scan the new item

Scan the barcode, QR code, or RFID tag of the item you want to send out instead. If the same product and variant has an active rental with a different item allocated, the Scanner lists those rentals.
2

Tap the rental

Tap the rental to move onto the scanned item, then confirm. The rental’s allocated item changes and the previous item is freed.
You can also start from the rental: open it in the Scanner, tap the item, and scan the replacement.
Use the update_cycle tool with:
  • id: the cycle ID, for example SC-1234
  • item_id: the item to assign
Use the Update a cycle endpoint with the itemId parameter.

Change product or variant

You can change the item on a cycle to an item from any product or variant. Changing the product on a cycle doesn’t change the product on the Shopify order. If the order needs to match, refund the line item in Shopify to cancel the existing cycle, then create a new cycle for the new product.
Changing the product doesn’t charge or refund the difference. Partially refund the original order, or create a draft order with a custom line item, to settle it.
1

Open Change item

On the cycle page, select Change item on the method card.

Select Change item, search for an item from the new product, Select item, then Save.

2

Search for an item from the new product

Search by product or variant name, or by item ID or serial, then select a row. Select Select item.
Supercycle limits how many items the search returns. If the item you’re looking for doesn’t show, add more of the serial or product name to narrow it.
3

Save

Select Save in the save bar.

Change rental period

Move the Arrive by and Return by dates of a cycle.
Changing the rental period doesn’t adjust the customer’s charges, and the new dates aren’t checked against other bookings. Check the item’s availability first, and charge or refund the difference separately.
1

Open Edit dates

On the cycle page, open the method card’s menu and select Edit dates.

Open the method card's menu, select Edit dates, pick the new dates, Apply, then Save.

2

Pick the new dates

Under Arrive by and Return by, select new dates for either or both, then select Apply.
3

Save

Select Save in the save bar. Closing the modal doesn’t save the change.
Use the update_cycle tool with:
  • id: the cycle ID, for example SC-1234
  • rental_start and rental_end: the new dates as YYYY-MM-DD
Use the Update a cycle endpoint with the rentalStart and rentalEnd parameters.

Change fulfillment date

Set or correct the date and time a cycle went out.
1

Open Edit fulfillment date

On the cycle page, open the fulfillment card’s menu and select Edit fulfillment date.

Open the fulfillment card's menu, select Edit fulfillment date, pick a date, then Save.

2

Pick the date and time

Select a date on the calendar and set the time under Fulfilled on. Select Clear to remove the fulfillment date.
3

Save

Select Save in the modal.
To mark several cycles as fulfilled today at once, use the Mark as menu on the Cycles table. See Fulfill the order.
When the order is fulfilled in Shopify, the cycle’s fulfillment date updates to match.
Use the update_cycle tool with:
  • id: the cycle ID, for example SC-1234
  • fulfilled_at: the fulfillment date as YYYY-MM-DD
Use the Update a cycle endpoint with the fulfilledAt parameter.

Change receival date

Set or correct the date and time a cycle’s item came back.
1

Open Edit receival date

On the cycle page, open the receival card’s menu and select Edit receival date.

Open the receival card's menu, select Edit receival date, pick a date, then Save.

2

Pick the date and time

Select a date on the calendar and set the time under Received on. Select Clear to remove the receival date.
3

Save

Select Save in the modal. The cycle’s status changes to Received.
To mark several cycles as received at once, tick them on the Cycles table, select in the selection bar, then Mark as > Returned.

Tick the cycles, open the ... menu, then select Mark as > Returned.

Marking a return as received also sets the receival date on its cycle.
Use the update_cycle tool with:
  • id: the cycle ID, for example SC-1234
  • received_at: the receival date as YYYY-MM-DD
Use the Update a cycle endpoint with the receivedAt parameter.

Edit restock by and prepare from dates

Override the buffer dates on one cycle when its item needs more or less preparation or restock time than the shop-wide logistics buffers give it. The date you set stays until the leg’s anchor date next moves. Revert to automatic date recalculates it from your logistics settings.
1

Open the card's menu

On the cycle page, open the menu on the fulfillment card for the prepare from date, or on the receival card for the restock by date.
2

Select the edit action

Select Edit prepare from date or Edit restock by date.
3

Set a date or revert

Pick a new date, or tick Revert to automatic date to recalculate it from the preparation or restock buffer in your logistics settings. Select Save.
Use the update_cycle tool with:
  • id: the cycle ID, for example SC-1234
  • prepare_from: the preparation start date as YYYY-MM-DD, or null to revert to automatic
  • restock_by: the restock date as YYYY-MM-DD, or null to revert to automatic
Use the Update a cycle endpoint with the prepareFrom and restockBy parameters. Pass null to revert either date to the automatic value.
Use the Update cycle action with the prepareFrom and restockBy fields. Pass null to clear the override and recalculate from your logistics settings.

Cancel a cycle

Refunding a line item on the Shopify order cancels its cycle.
1

Open the order

On the cycle page, select View order to open the Shopify order. You can also open it from Orders.
2

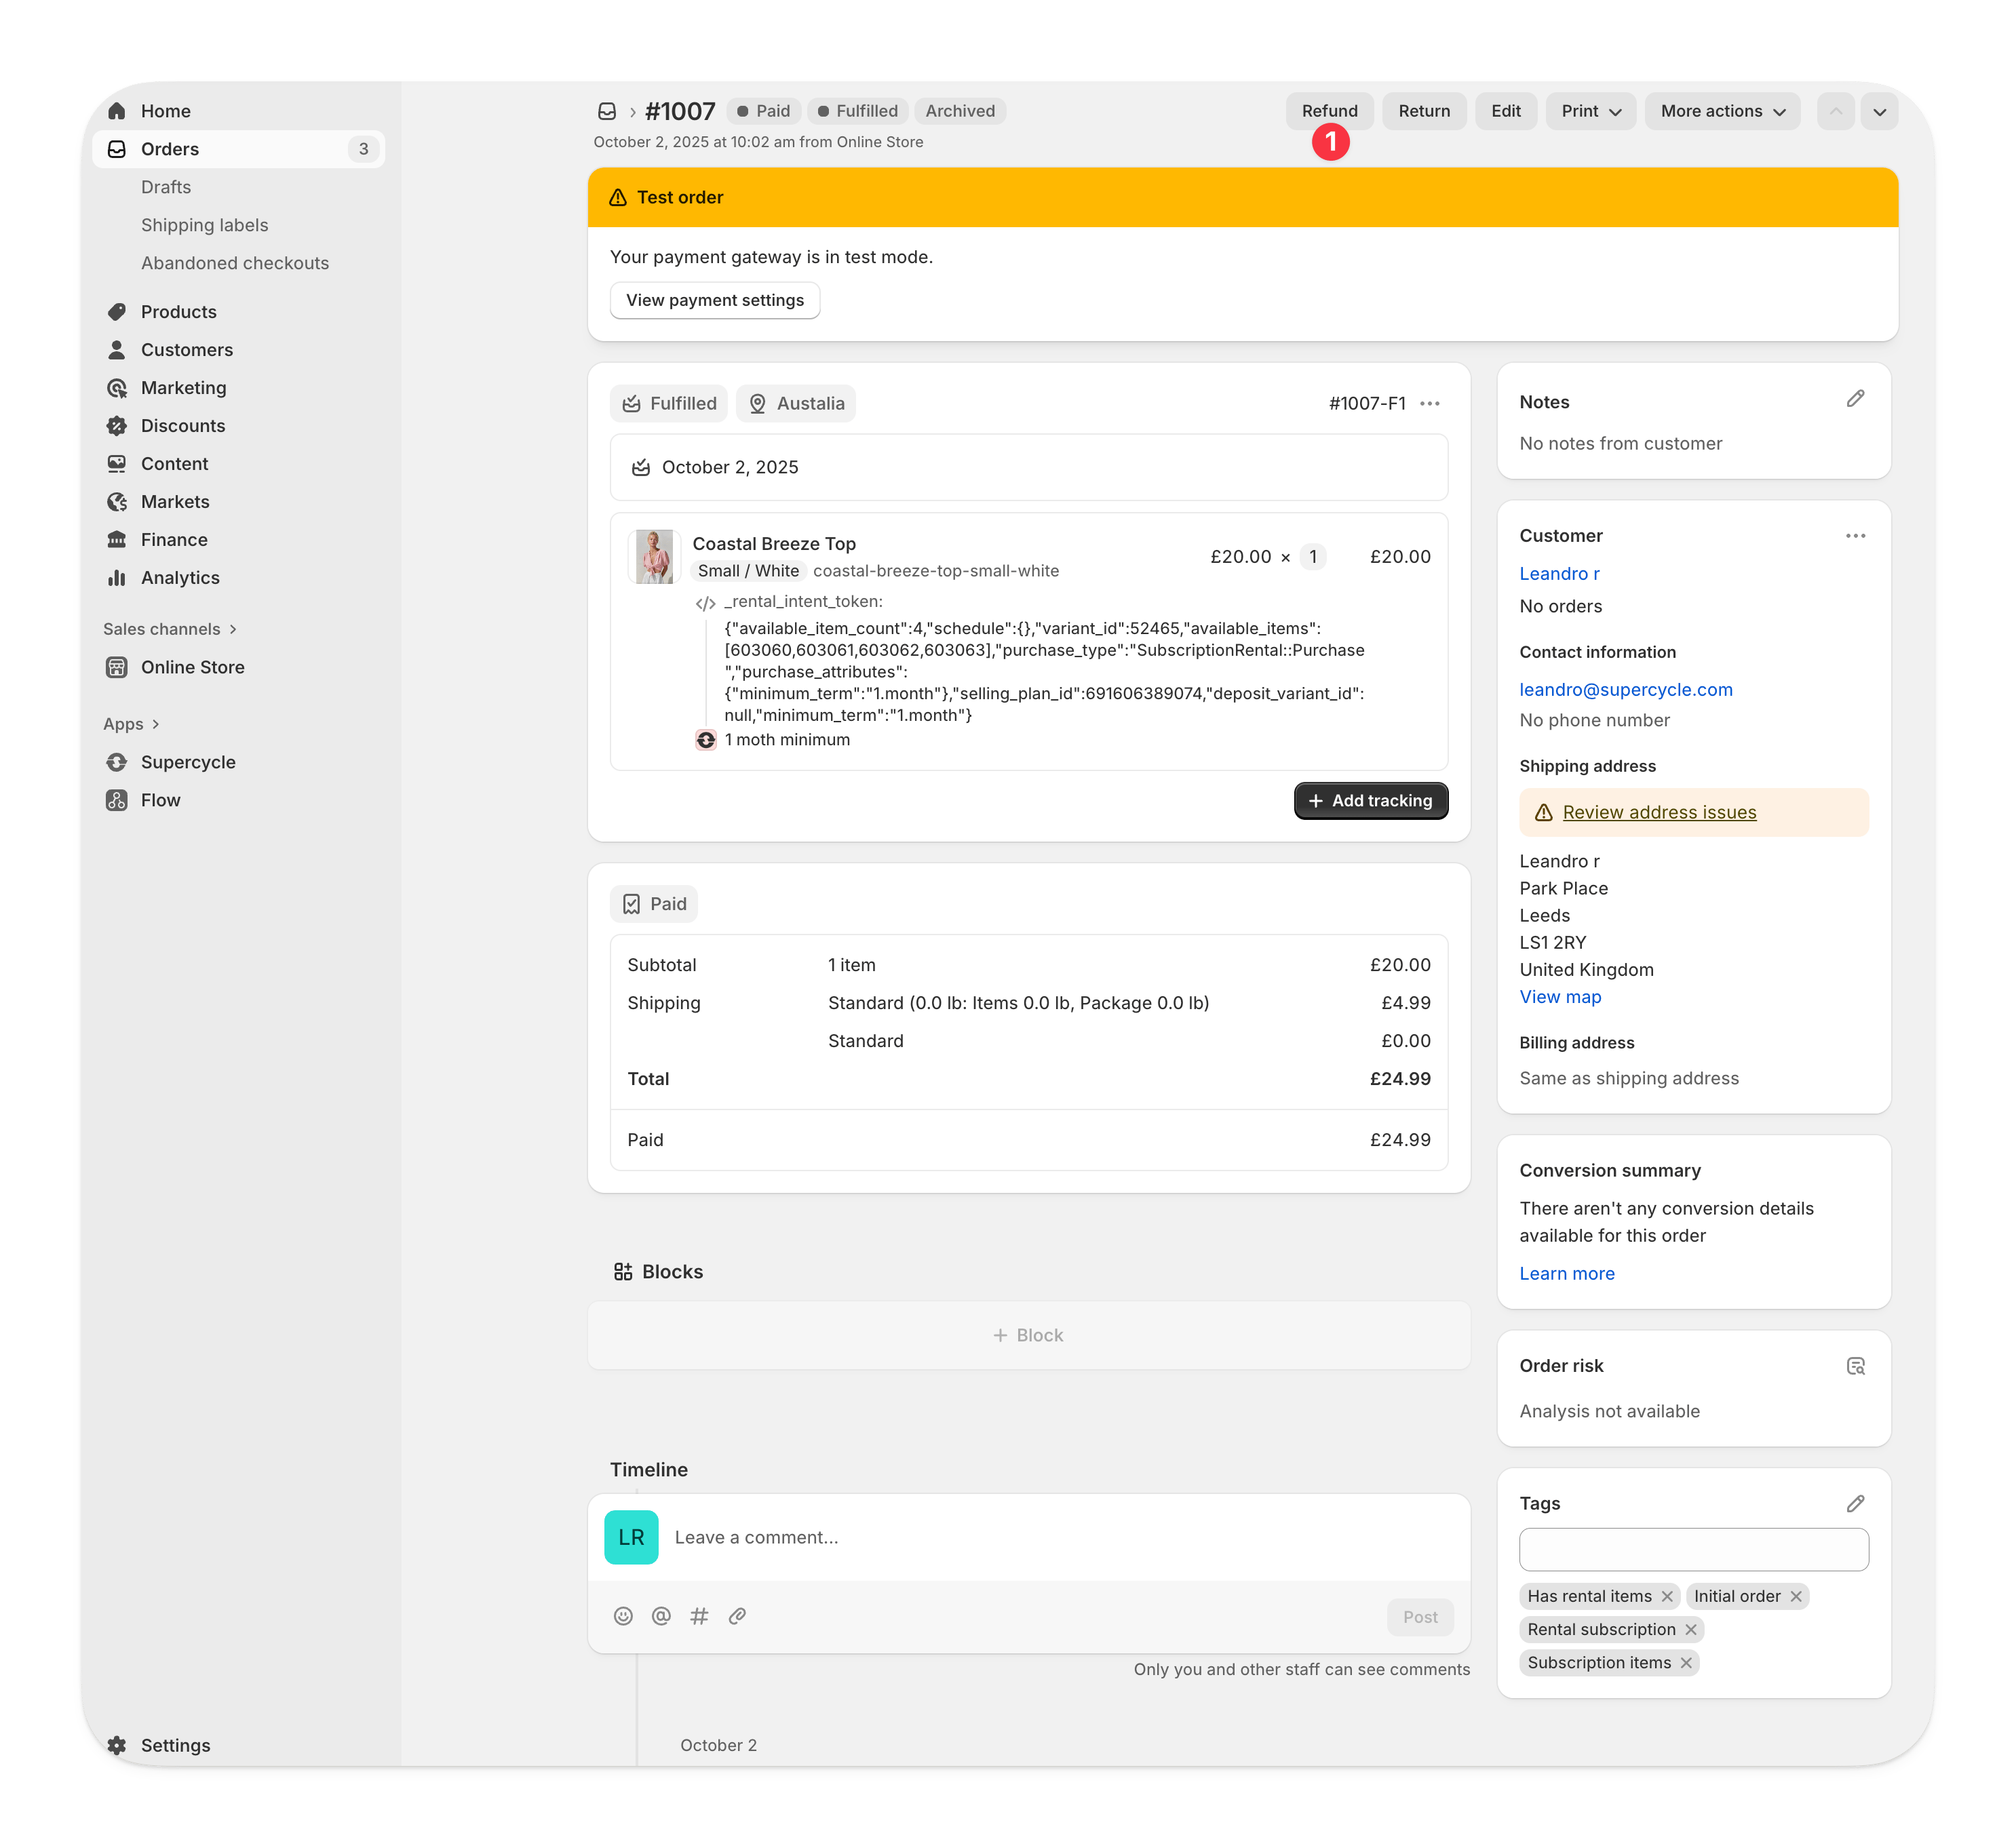
Start a refund

Select Refund.
A Shopify order page for a fulfilled Coastal Breeze Top cycle with the Refund action in the header

Refund in the order's header

3

Refund the line items

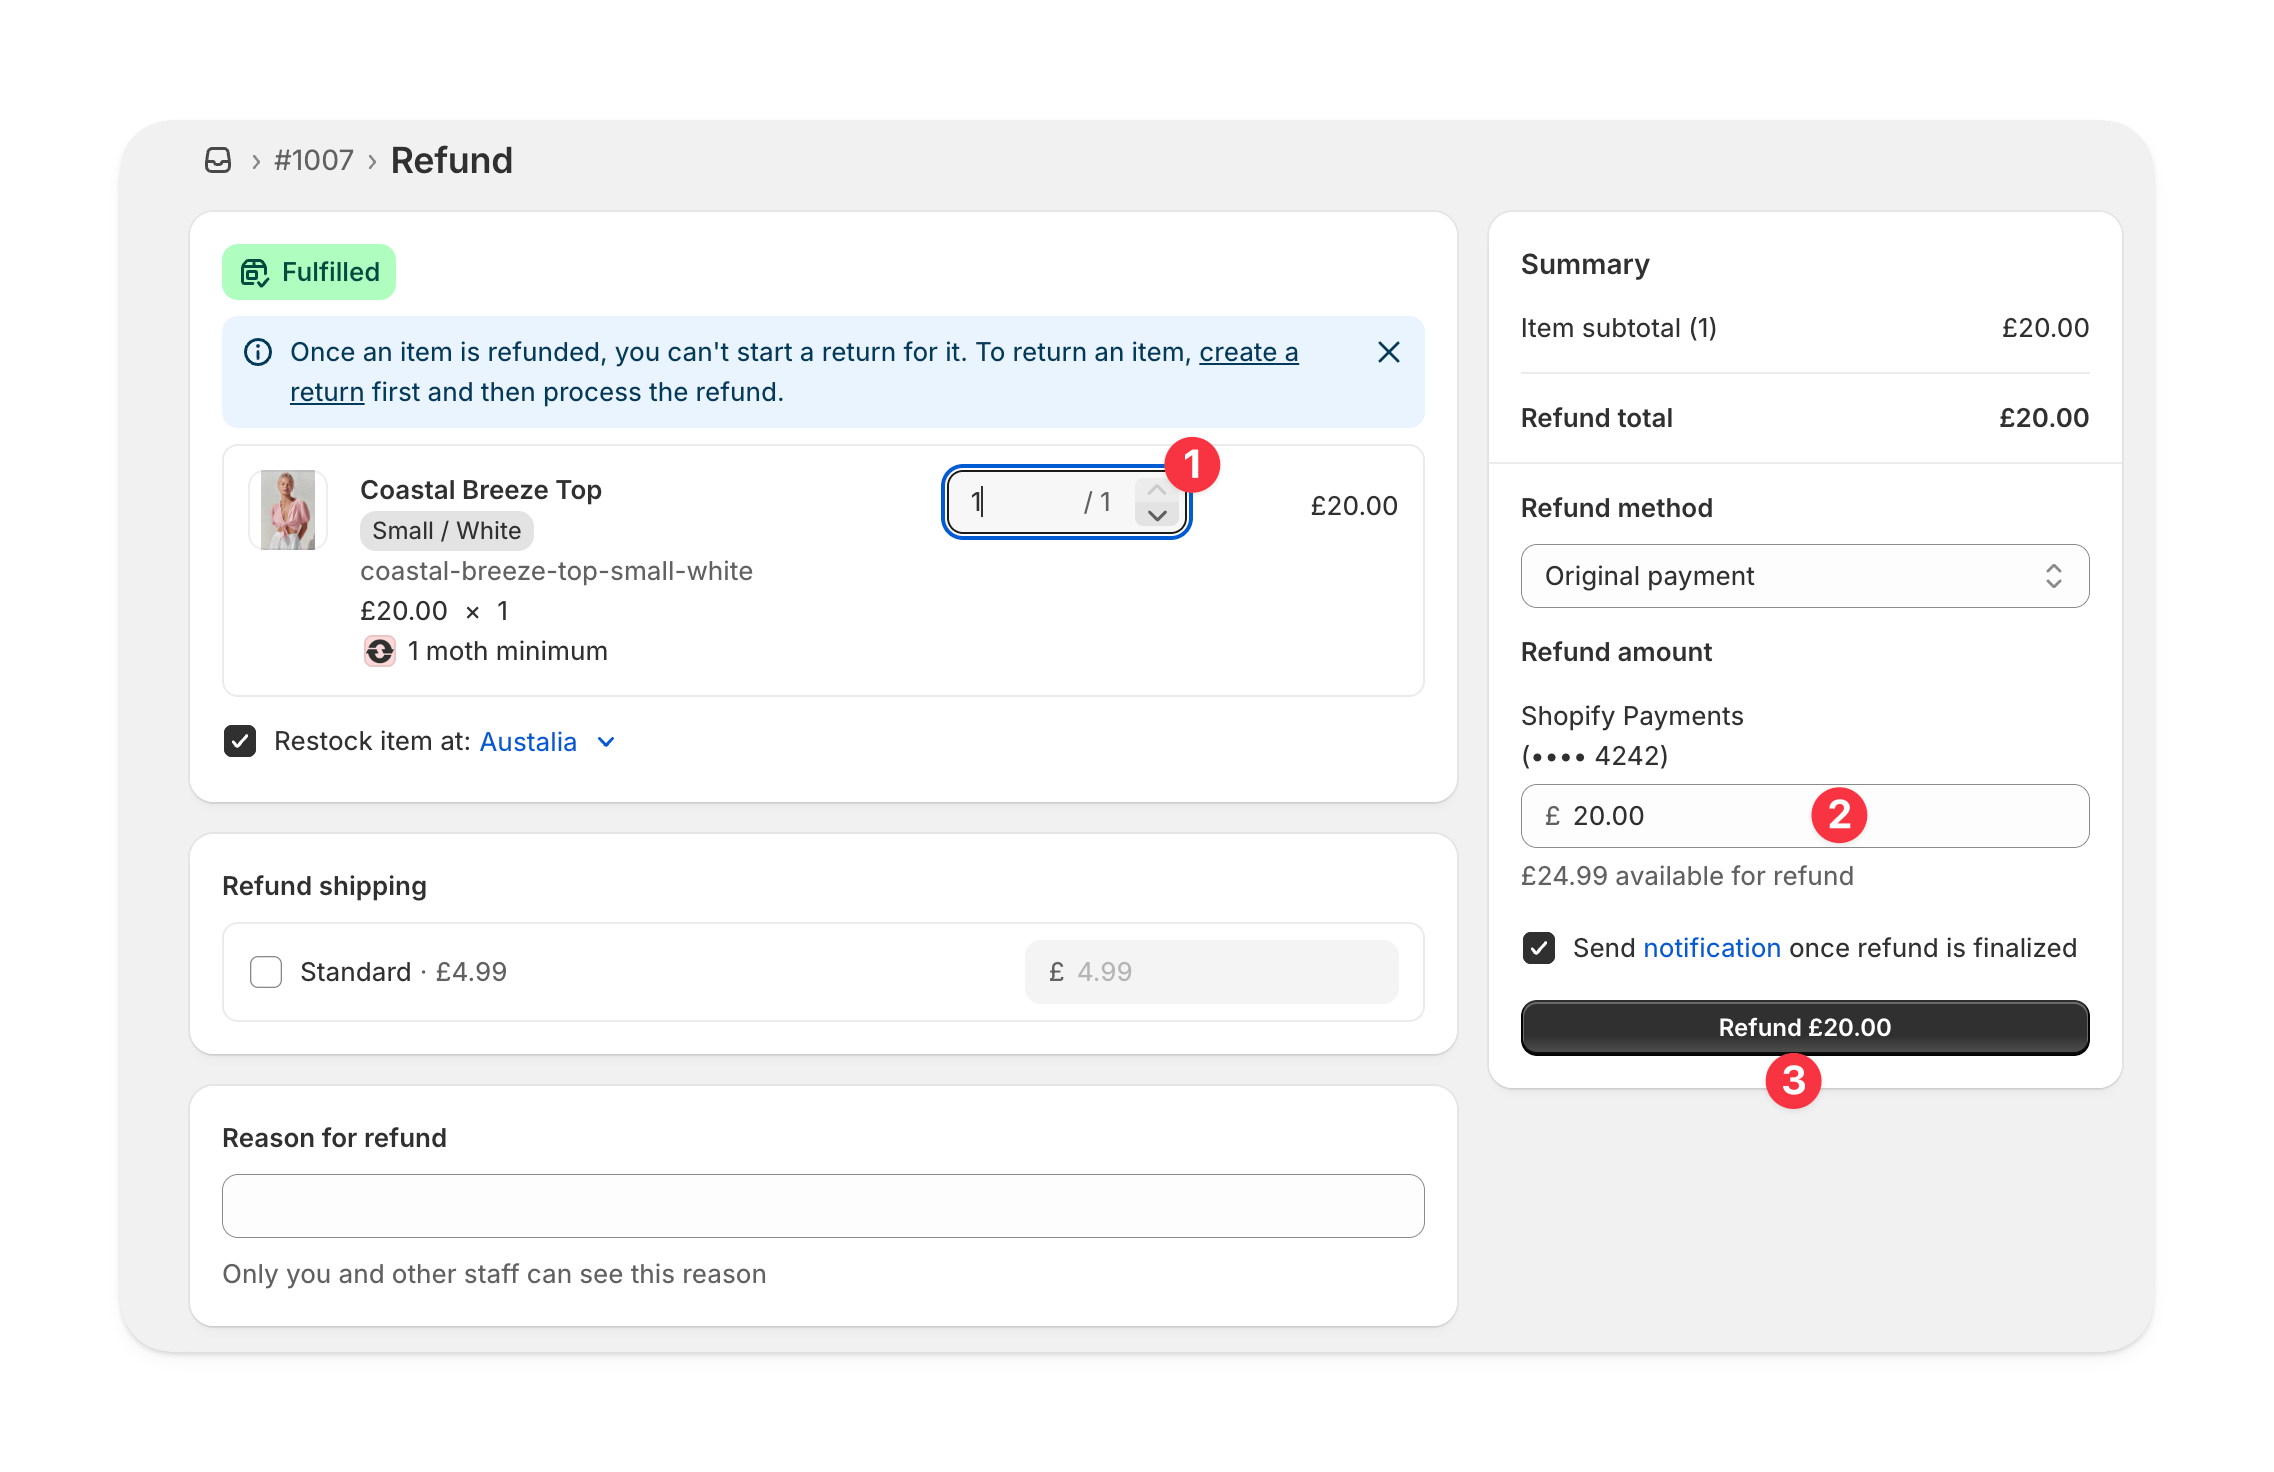
Set a quantity on each line item whose cycle you want to cancel. The refund amount is up to you and doesn’t affect whether the cycle is canceled.
Shopify's Refund page with a quantity of 1 on the Coastal Breeze Top line item and the refund amount and Refund button in the summary

A quantity of 1 on the line item, then Refund

4

Confirm the refund

Select Refund.
Refunding a line item cancels its cycle whatever the cycle’s status, including a cycle whose item is already with the customer.