Identity verification is currently a request access feature. Join the waitlist from your Supercycle home page to enable it on your store.
This page covers the new identity verification flow. The previous Stripe Identity integration (configured under Settings > Risk) is being retired — stores on the new flow no longer use it. If you’re still on Stripe Identity, contact support to migrate.
Setup
1
Open a product and pick a cycle method
In your Shopify admin, go to Supercycle > Products and open the product you want to gate behind ID verification. Select the Calendar, Membership, or Subscription method tab — verification is configured at the option level on each method, so a product with multiple methods needs the flag turned on per method.
2
Turn on Require ID verification on each option
Each method has a list of options (rental periods on Calendar, plans on Membership and Subscription). Click an option to open its modal, find the Require ID verification checkbox, tick it, and save.The option list shows an ID verification column with a Required / Not required badge so you can see at a glance which options will trigger a check.
3
(Optional) Bulk-apply across many options
From Supercycle > Products, click Method options in the top right, pick a method, select the options you want, then use the 3-dot (…) menu in the bulk action bar to Apply ID verification required.
4
Add the verification block to the Thank you page
Go to Settings > Checkout, customize the checkout, switch to the Thank you page, and add the Identity Verification Required app block. Save.The block reads the order’s cart-line intent data and renders one of: a “verify your identity” CTA (link opens the Persona embed at
<your_proxy_url>/identity_verification), or nothing if the customer is already verified or no flagged cycle was purchased.5
(Optional) Edit the customer-facing copy
Go to Settings > Language and edit the strings for the identity verification block, customer account section, and verification page.
How customers verify
When a customer checks out with a flagged cycle, Supercycle creates an identity verification request against their account. Customers can complete the check from any of these surfaces:- Thank you page — the Supercycle Identity verification block shows immediately after checkout with a button to start verification.
- Customer account — the Identity verification section on their account page shows the current status and lets them resume an in-progress verification or retry a failed one.
<your_proxy_url>/identity_verification on your store.
Request verification manually
You can ask a customer to verify their identity even if they haven’t bought a flagged cycle — useful when you need an extra check before fulfilling a rental, or when a previous request expired.1
Open the customer's profile
In Supercycle, open the customer’s profile.
2
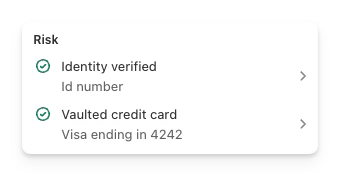
Find the Risk section
In the Risk section, find Identity verification not requested.
3
Request ID verification
Select Request ID verification.
Request verification from POS
Store staff can start ID verification directly from Shopify POS using the Verify ID action on the order details and post-purchase screens. POS displays a QR code and a shareable link that customers can use to verify on their own phone, and the screen updates automatically once they’re done. See Verify a customer’s ID on POS for the staff-facing steps.Check customer verification status
The button is hidden once the customer has an outstanding request or an approved verification.Check verification status
A customer’s verification status is shown on their profile in Supercycle. From there you can:- See the current status (pending, submitted, in review, completed, on hold, expired) and result (approved, rejected, inconclusive).
- Open View details to inspect the full verification record, including the documents and reports returned.
- Filter the Customers and Rentals pages by Identity status (see below).
Filter by Identity status
The Identity status filter on the Customers and Rentals pages narrows the list to customers whose verification has reached a particular outcome. Approval is a customer-level property: one approved verification clears every outstanding request that customer has, so a customer is matched against the most favourable outcome they’ve reached.
Use Verified to find customers who can rent without further checks, Failed to follow up with customers whose verification didn’t pass, and Unverified to chase customers who started but haven’t completed a check.
Statuses
FAQs
Which provider runs the verification checks?
Which provider runs the verification checks?
Supercycle currently uses Persona to run identity verification. We may swap providers in the future — we’ll always select the solution that best serves our merchants, and any change will be transparent to your customers.
Why was Stripe Identity replaced?
Why was Stripe Identity replaced?
The new integration offers stronger document support, manual review, and richer status reporting. The provider-agnostic data model also means we can swap or add providers in the future without changing your setup.
How is this different from the old Stripe Identity setup?
How is this different from the old Stripe Identity setup?
The previous Stripe Identity flow was configured globally under Settings > Risk (verification type, document types, live capture, matching selfie). The new flow has no global configuration — you turn on Require ID verification per method option, and Persona handles the document/selfie logic. Settings > Risk still has an ID verification section, but it only summarizes the feature and links to Products so you can manage which options require a check.
What happens if a customer has multiple cycles that require verification?
What happens if a customer has multiple cycles that require verification?
Approval is a customer-level property. One approved verification fulfils every outstanding request that customer has, regardless of how many cycles triggered them.
Are there other identity verification providers?
Are there other identity verification providers?
Supercycle ships with a single built-in provider. There are also third-party Shopify apps such as RealID, iDenfy and Engage Message that you can run alongside Supercycle.