> ## Documentation Index
> Fetch the complete documentation index at: https://docs.supercycle.com/llms.txt
> Use this file to discover all available pages before exploring further.

# Item actions

> Step-by-step guides for creating, updating, retiring, and managing inventory items

### Create items

You should create inventory inside your Supercycle product, not your Shopify product, as Supercycle is responsible for inventory management after import.

<AccordionGroup>
  <Accordion title="In bulk, from a Product">
    <Steps>
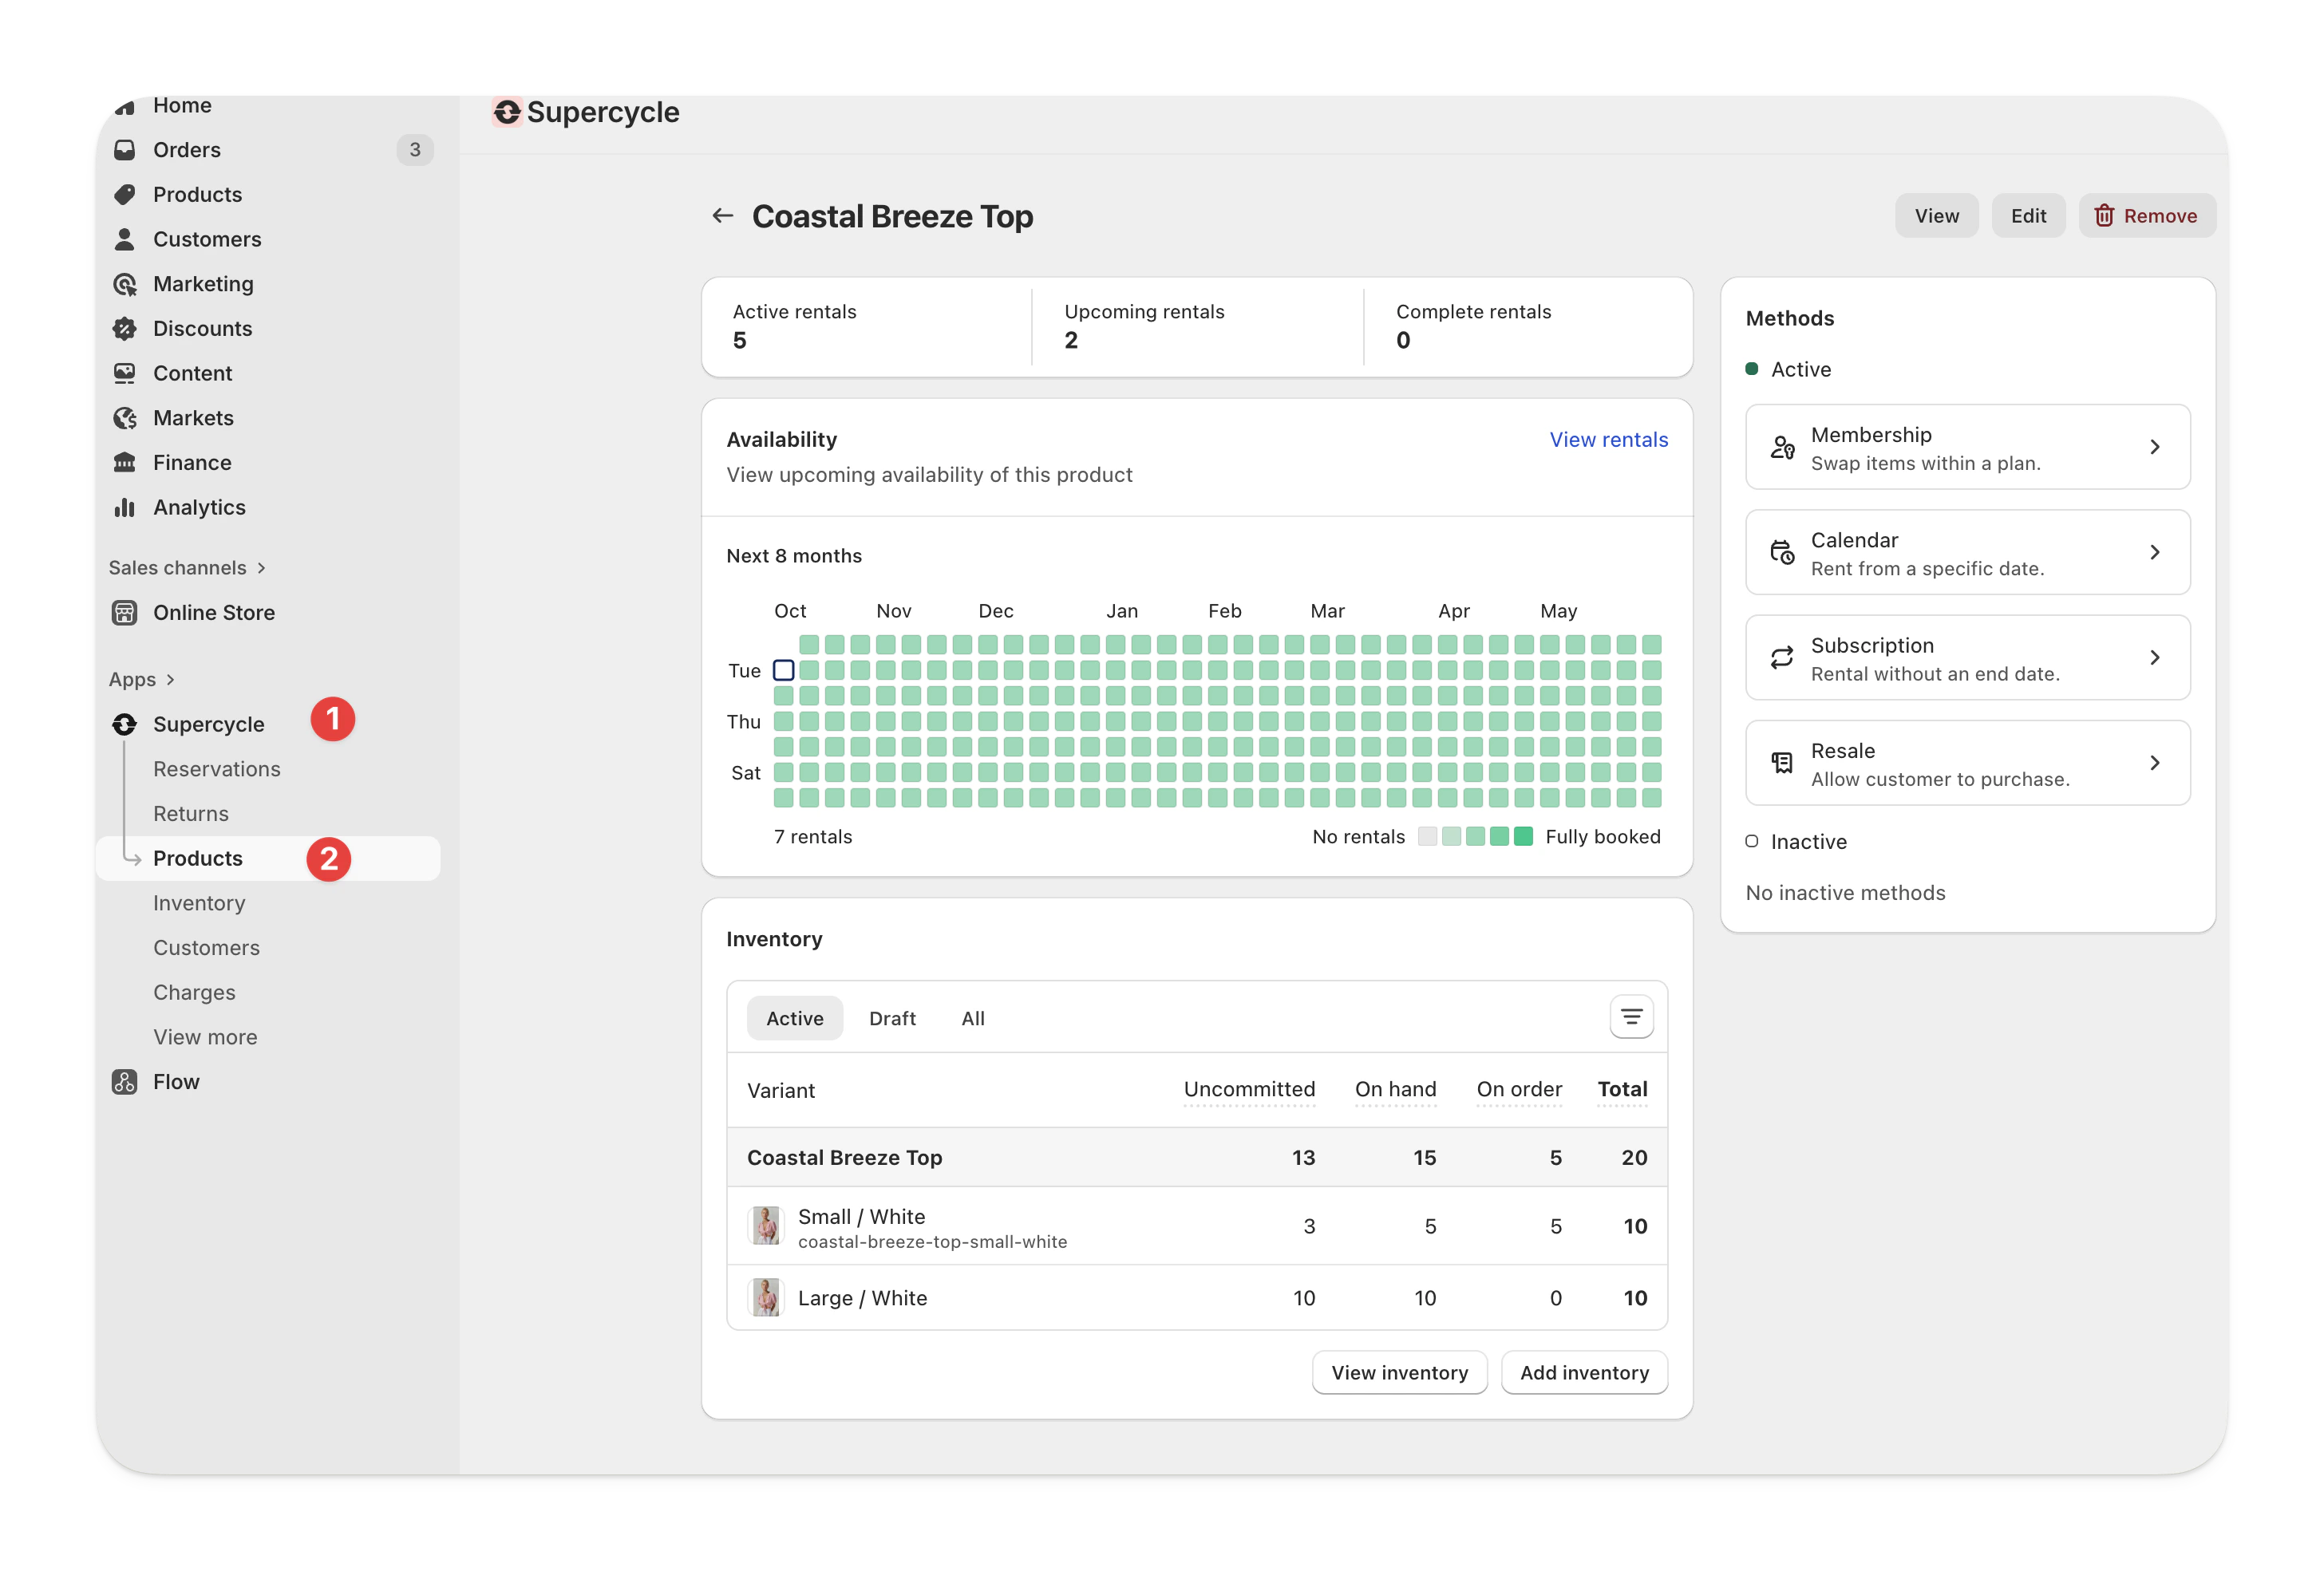
      <Step title="Navigate to the product">
        In Shopify Admin, head to **Supercycle** > <Icon icon="shopify" iconType="solid" /> [**Products**](https://admin.shopify.com/apps/supercycle/products/) > **Product**.

        <Frame type="glass">
          <img src="https://mintcdn.com/supercycle/Omgmq0rsgqX1BZKa/images/screenshots/supercycle-admin/product-navigation.png?fit=max&auto=format&n=Omgmq0rsgqX1BZKa&q=85&s=0998e29f789664706446e296336ff856" width="2912" height="1969" data-path="images/screenshots/supercycle-admin/product-navigation.png" />
        </Frame>
      </Step>

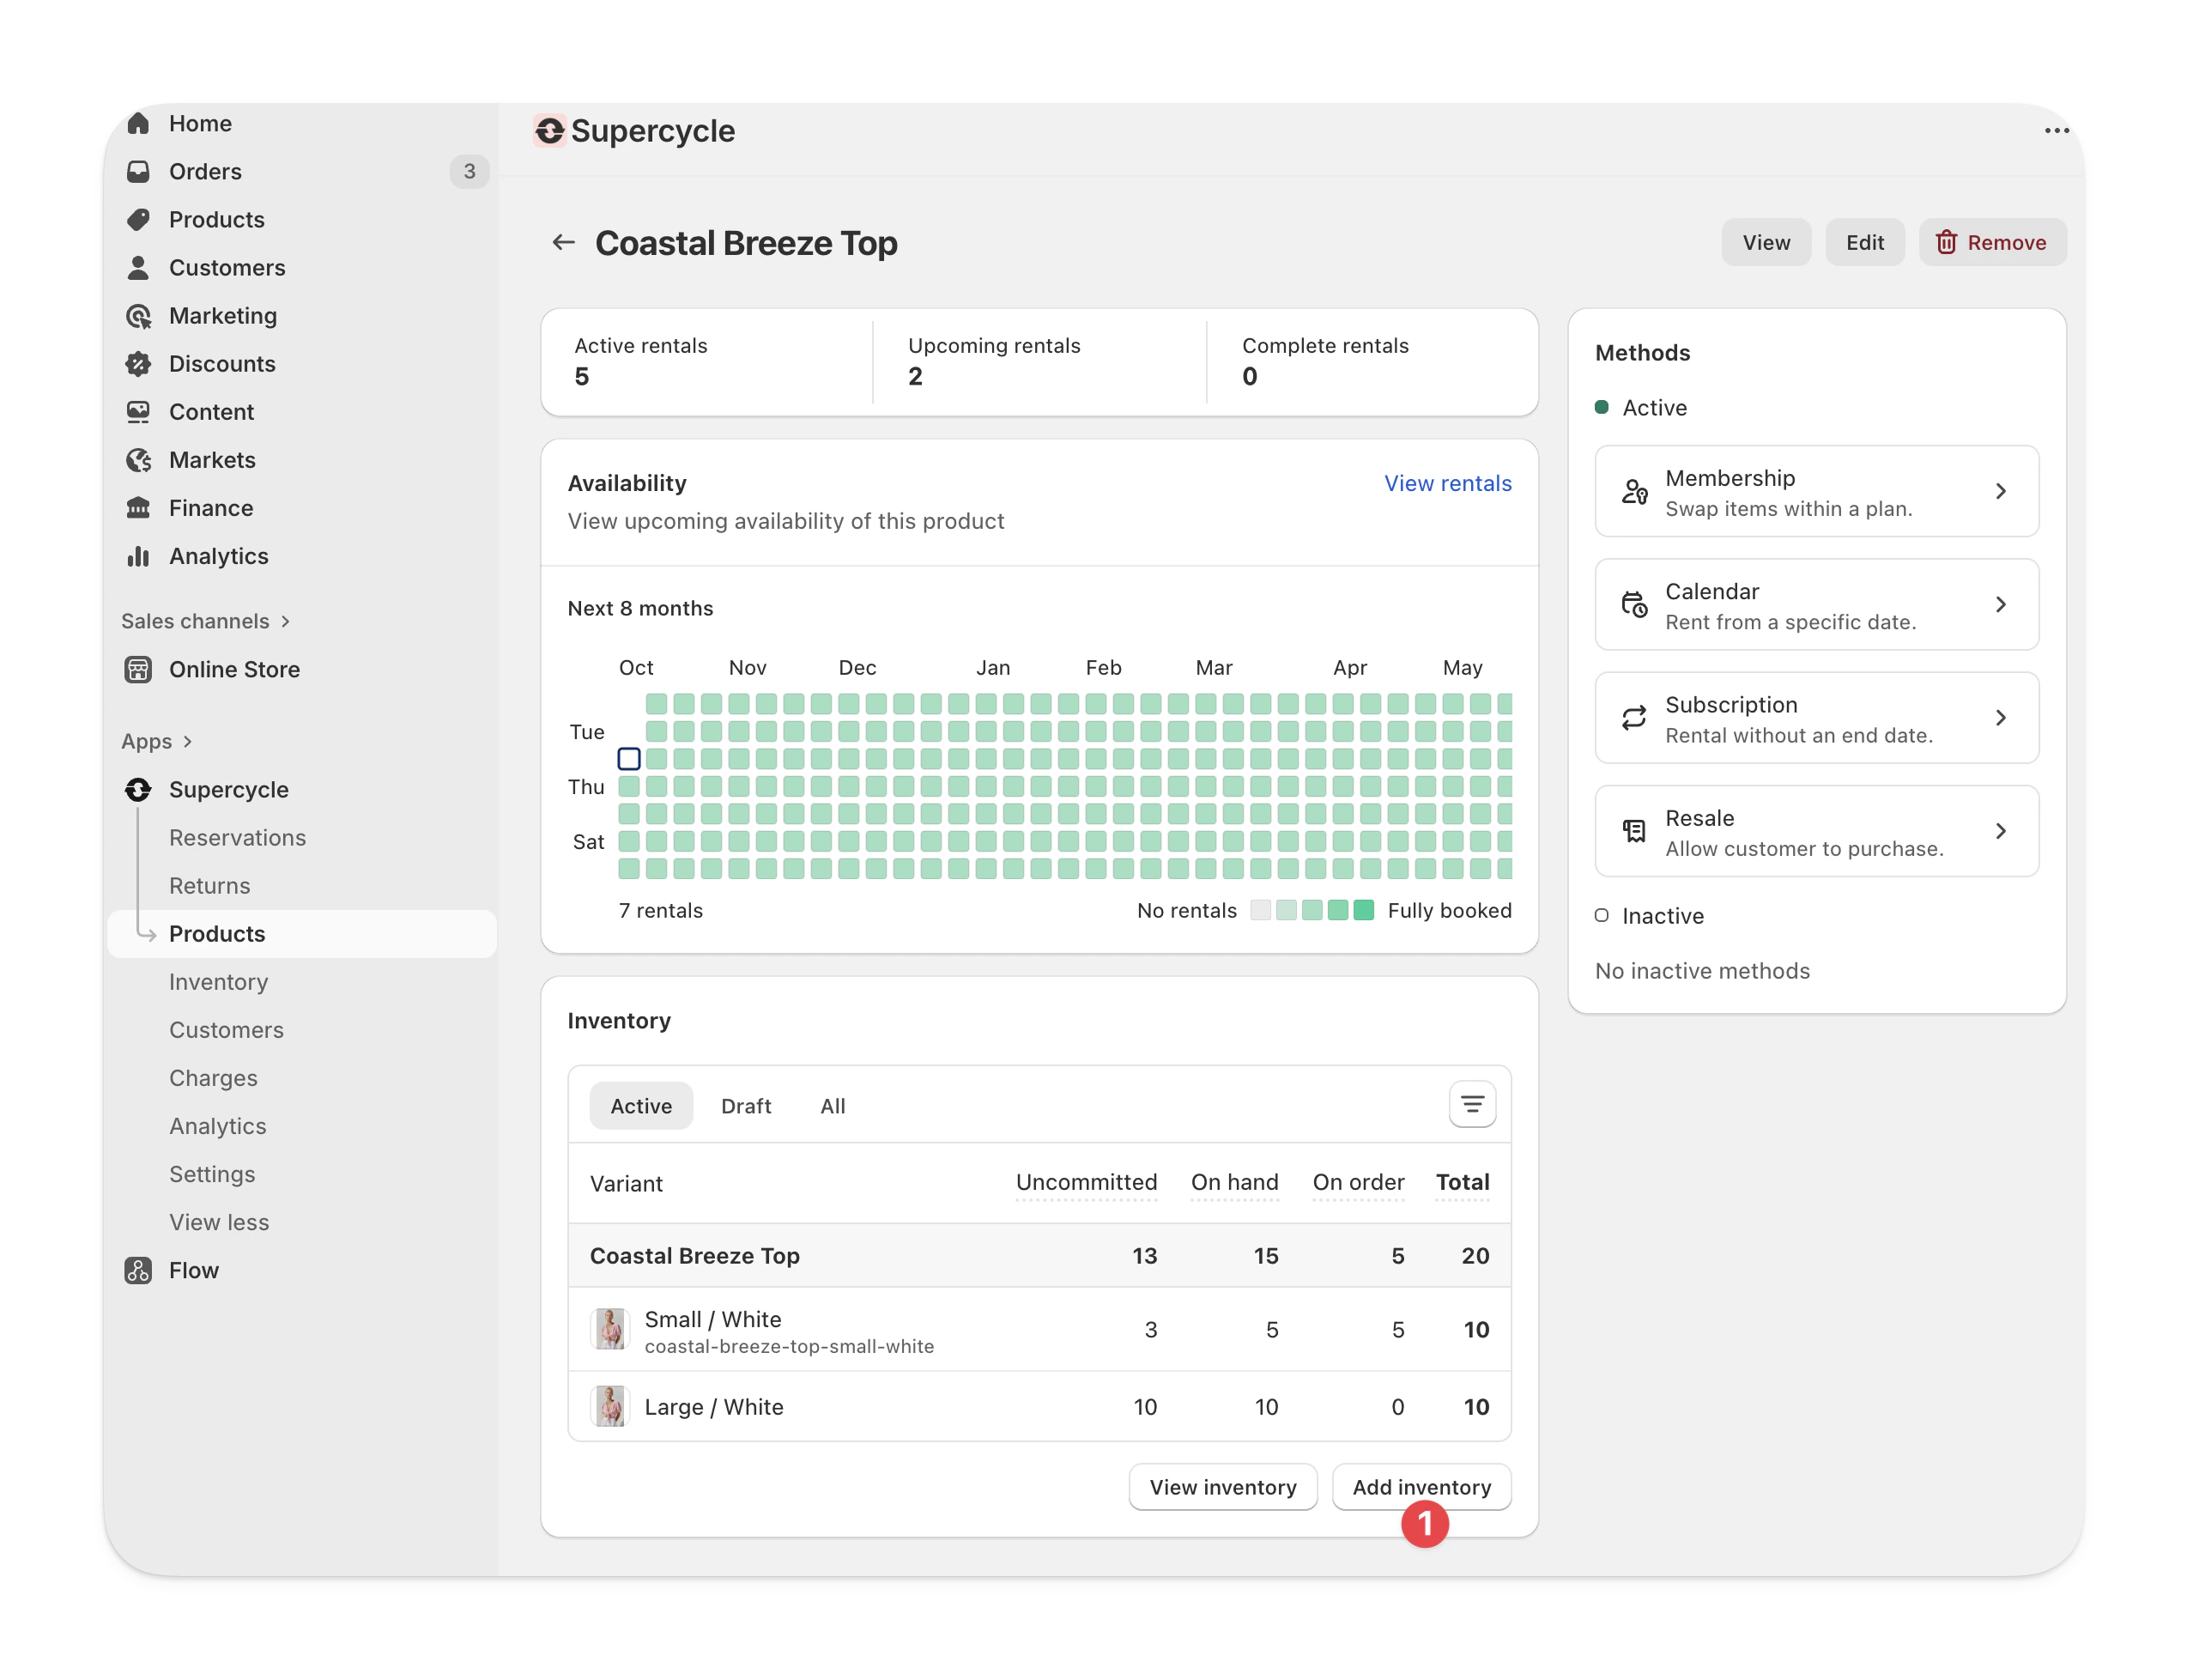
      <Step title="Add inventory">
        In the variants table, under the status you want to add a product, select the current quantity dropdown followed by **Add inventory**.

        <Frame type="glass">
          <img src="https://mintcdn.com/supercycle/Omgmq0rsgqX1BZKa/images/screenshots/supercycle-admin/product-add-inventory.png?fit=max&auto=format&n=Omgmq0rsgqX1BZKa&q=85&s=88f9674459bfe76cddf82d0b8f9d78e0" width="2548" height="1957" data-path="images/screenshots/supercycle-admin/product-add-inventory.png" />
        </Frame>
      </Step>

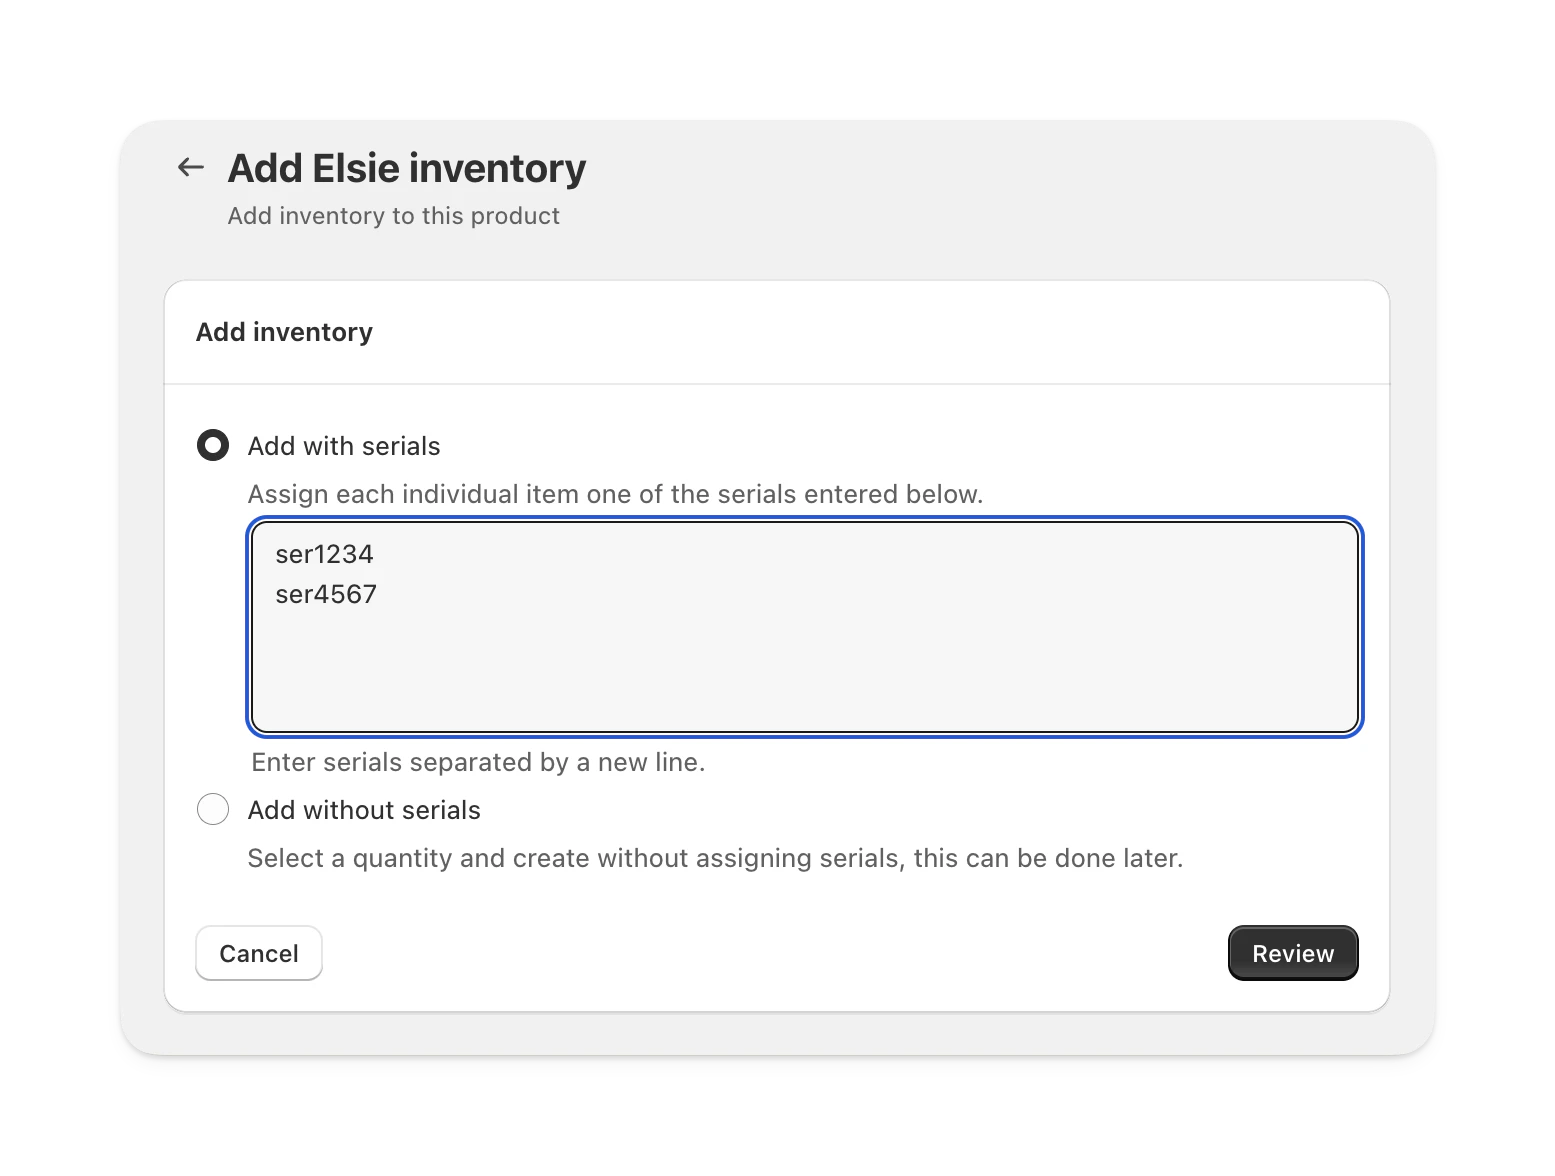
      <Step title="Add serials">
        On the next page, add a serial number on a new line for each item you'd like to create.

        Alternatively, select **Add without serials** and enter a number of items. You can add serials to the newly created items later from their item page.

        <Frame type="glass" caption="In this example, we are creating two new items with serials ser1234 and ser4567">
          <img src="https://mintcdn.com/supercycle/Omgmq0rsgqX1BZKa/images/screenshots/supercycle-admin/product-add-inventory-serials.png?fit=max&auto=format&n=Omgmq0rsgqX1BZKa&q=85&s=96aa59de2616a40b0d2213d7a1b78c49" width="1555" height="1176" data-path="images/screenshots/supercycle-admin/product-add-inventory-serials.png" />
        </Frame>

        Click **Review** to continue.
      </Step>

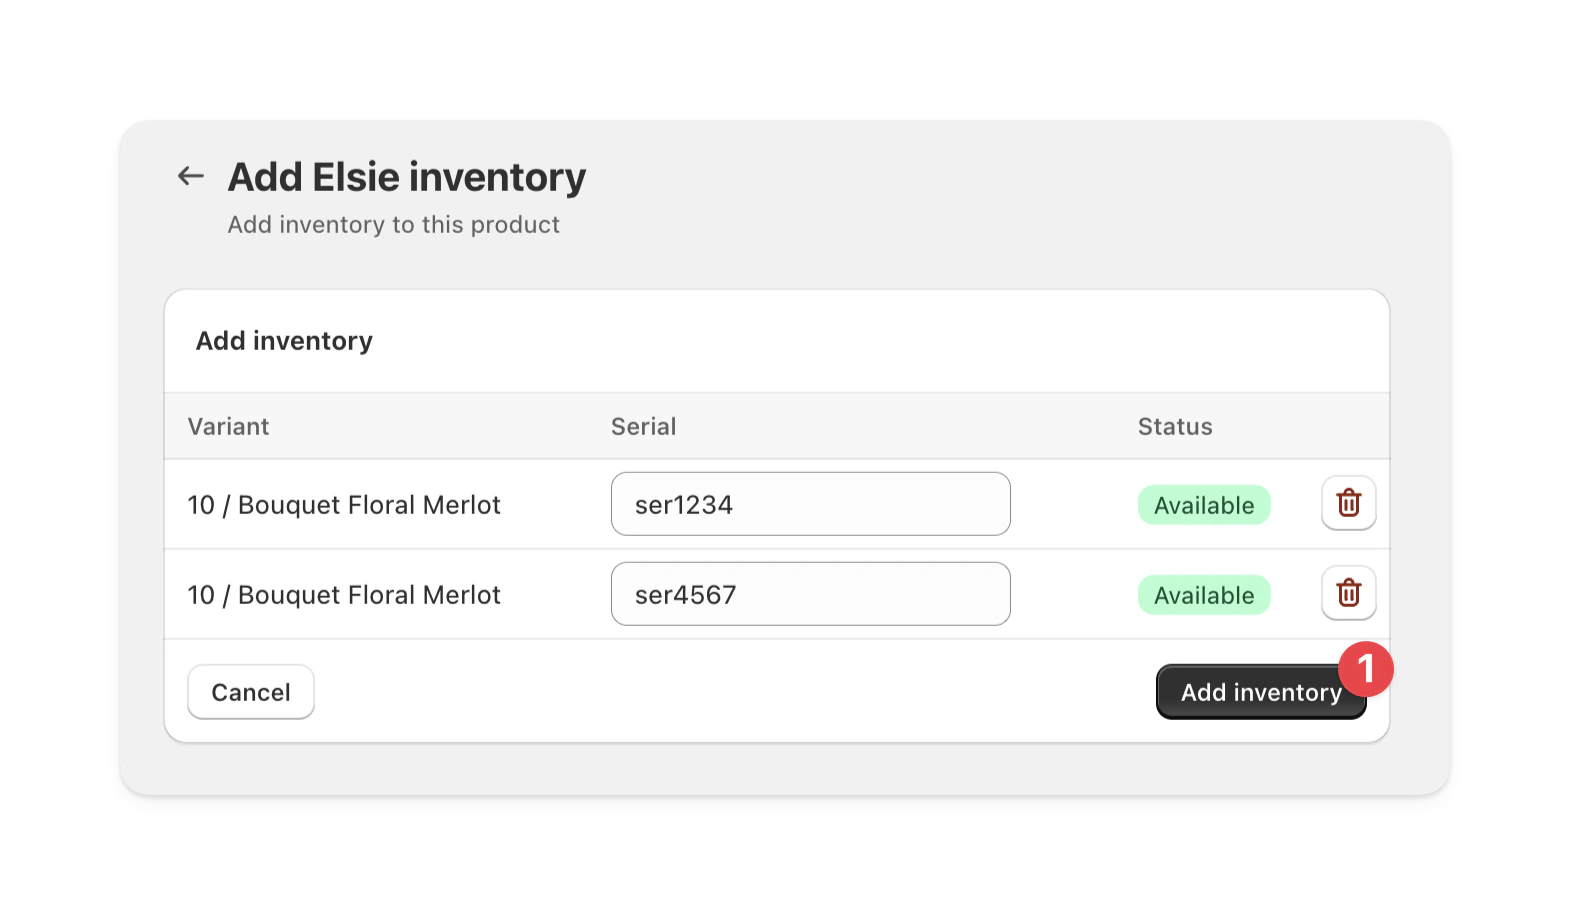
      <Step title="Review new items">
        Review the items you're about to add and click **Add inventory** to save your changes.

        <Frame type="glass">
          <img src="https://mintcdn.com/supercycle/Omgmq0rsgqX1BZKa/images/screenshots/supercycle-admin/product-add-inventory-review.png?fit=max&auto=format&n=Omgmq0rsgqX1BZKa&q=85&s=32aa6532eb40530a5b8ce62998f8d477" width="1570" height="915" data-path="images/screenshots/supercycle-admin/product-add-inventory-review.png" />
        </Frame>
      </Step>
    </Steps>
  </Accordion>

  <Accordion title="In bulk, from a CSV import">
    <Steps>
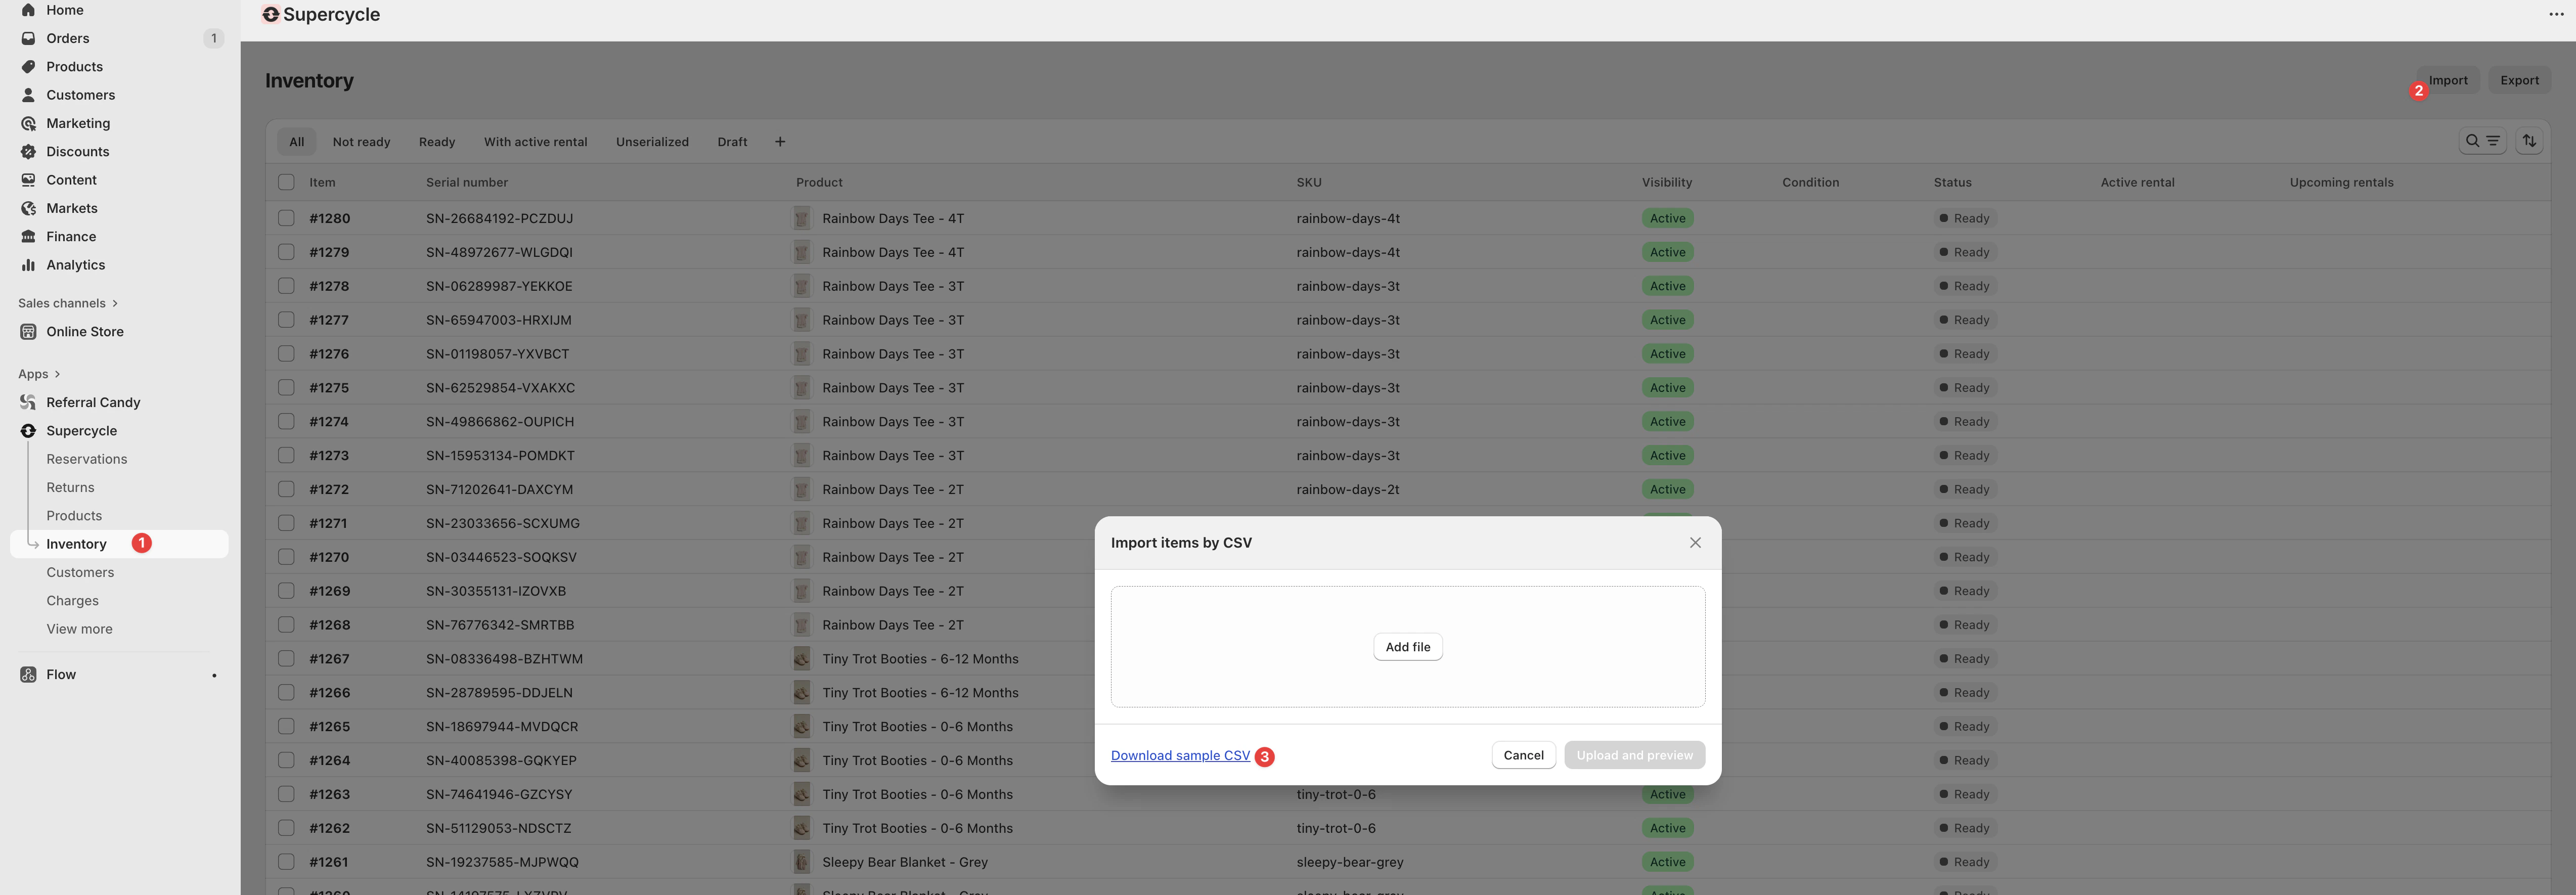
      <Step title="Download the import template">
        Always use the provided template (Sample CSV). Exports often contain extra columns that imports ignore.

        <Frame type="glass">
          <img src="https://mintcdn.com/supercycle/XbKBsdX_PulItpyX/images/items/items-import-steps.png?fit=max&auto=format&n=XbKBsdX_PulItpyX&q=85&s=17199d8cc0e9609b9fa7fe82741fced8" alt="Download example CSV" width="5094" height="1770" data-path="images/items/items-import-steps.png" />
        </Frame>
      </Step>

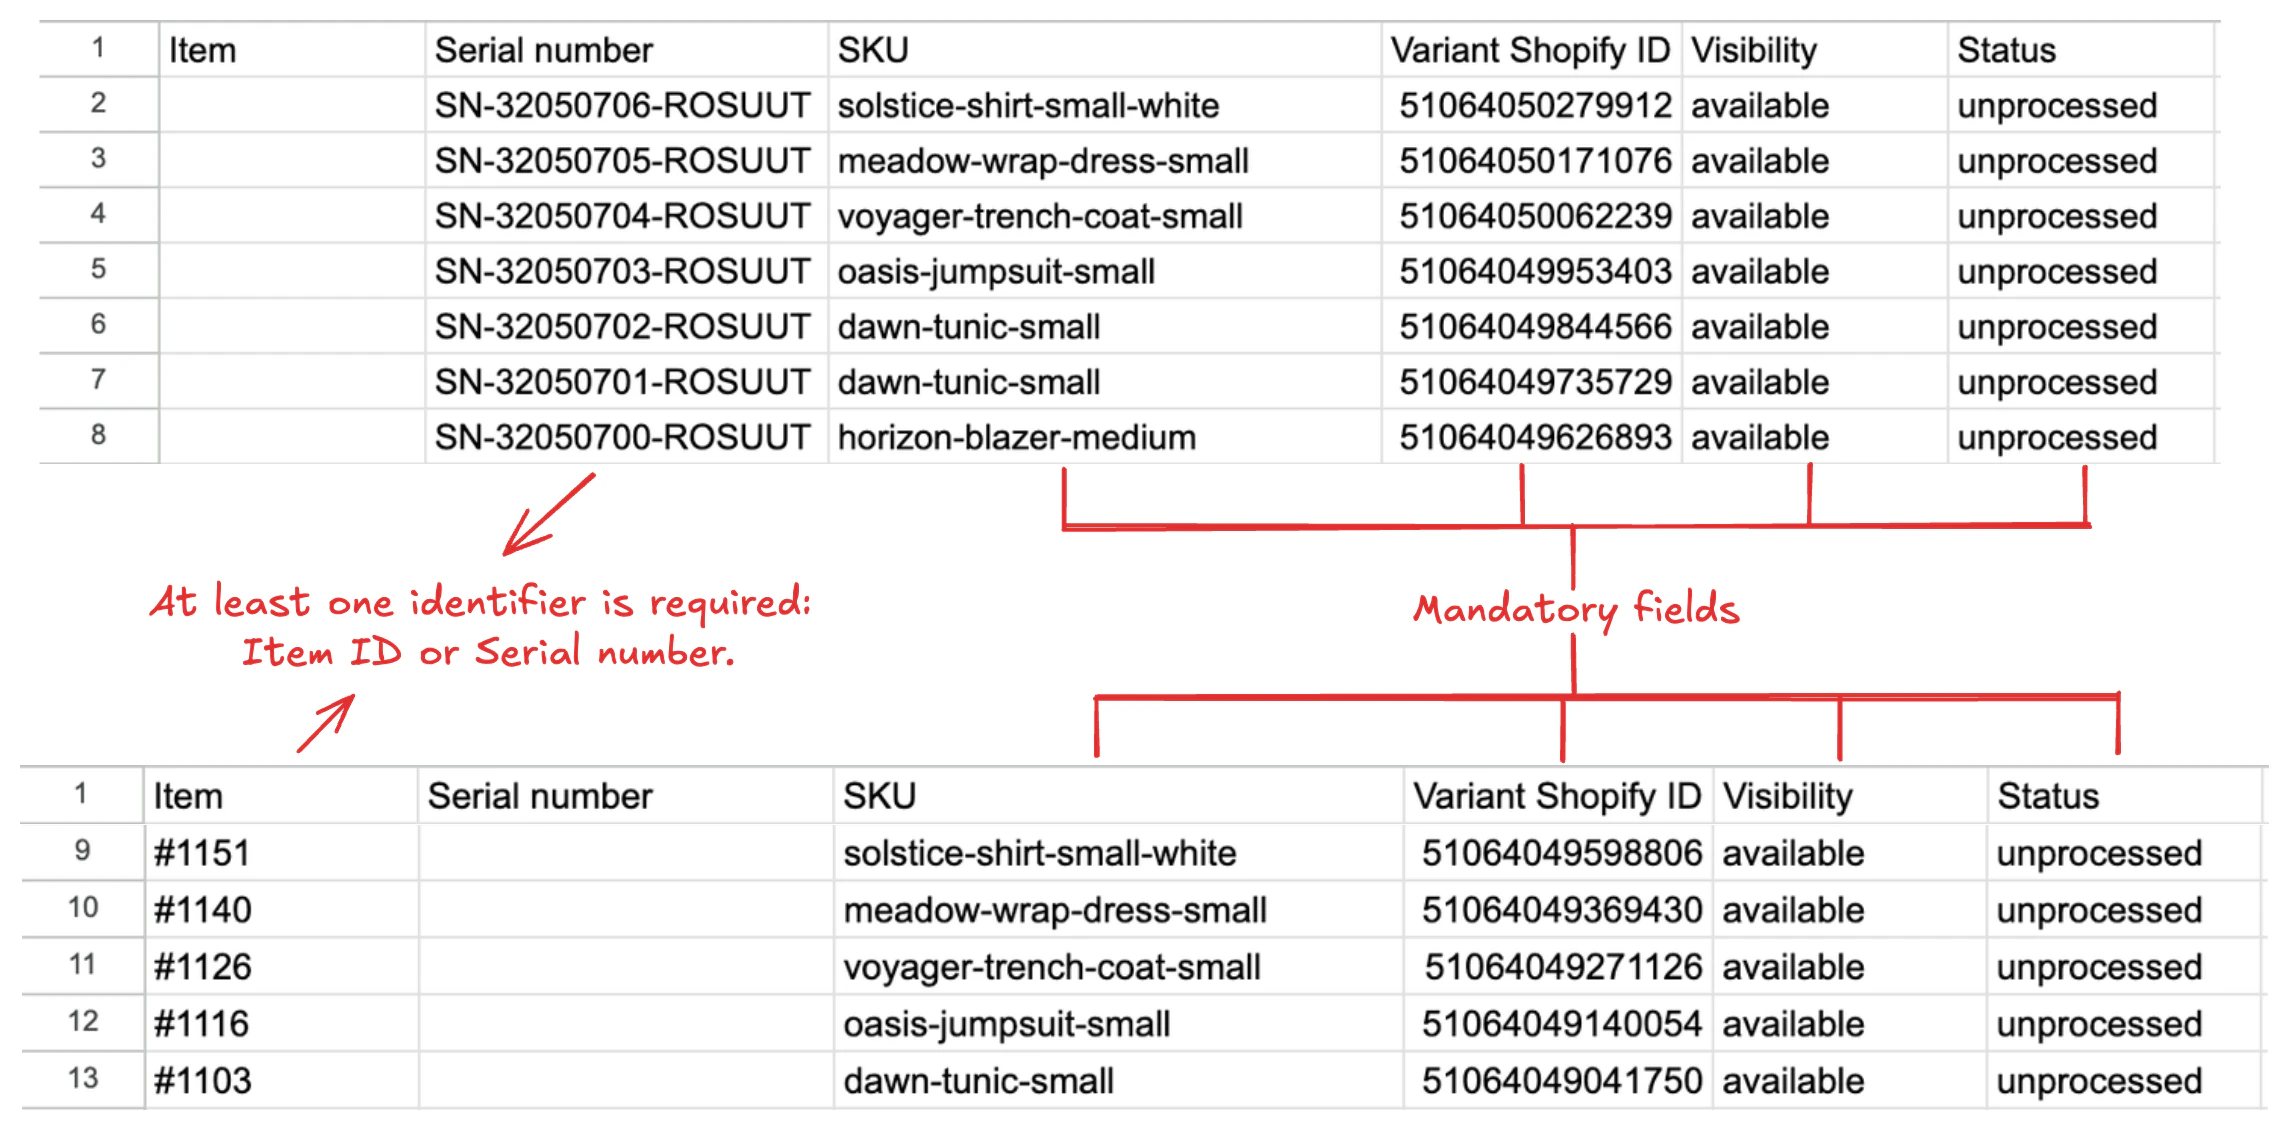
      <Step title="Fill in required columns">
        Every row represents one item. Include these columns:

        <br />

        <table>
          <thead>
            <tr><th>Column</th><th>Purpose</th></tr>
          </thead>

          <tbody>
            <tr><td><b>Item</b></td><td>Unique ID for the item (for example, #2001). New ID = new item. Existing ID = update that item.</td></tr>
            <tr><td><b>Variant Shopify ID</b></td><td>Links the item to its Shopify product variant.</td></tr>
            <tr><td><b>SKU</b></td><td>Stock keeping unit. Recommended even if Variant ID is included.</td></tr>
            <tr><td><b>Visibility</b></td><td>Sets whether the item is <code>available</code> or <code>unavailable</code>.</td></tr>
            <tr><td><b>Status</b></td><td>Workflow state, such as <code>processed</code>, <code>unprocessed</code>, or <code>retired</code>.</td></tr>
          </tbody>
        </table>

        Optional columns include <b>Condition</b>.

        <Frame type="glass">
          <img src="https://mintcdn.com/supercycle/XbKBsdX_PulItpyX/images/items/import-fields.png?fit=max&auto=format&n=XbKBsdX_PulItpyX&q=85&s=7663c5a44d372542bd49e288fcf386b2" alt="Mandatory fields for the import" width="2289" height="1130" data-path="images/items/import-fields.png" />
        </Frame>
      </Step>

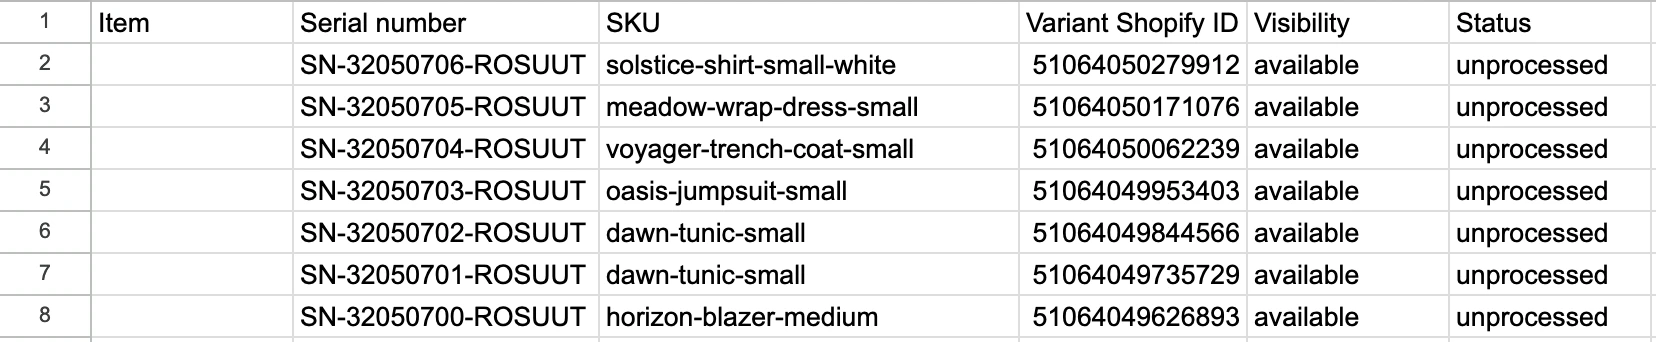
      <Step title="Add new items">
        Use a **new Item ID** or **Serial number** and provide the correct Variant Shopify ID and SKU.\
        Example:

        <Frame type="glass">
          <img src="https://mintcdn.com/supercycle/XbKBsdX_PulItpyX/images/items/import-new-items-with-serial-numbers.png?fit=max&auto=format&n=XbKBsdX_PulItpyX&q=85&s=3f68f1ac962fa99f3dd0a0e2128f5034" alt="Example CSV row for new items" width="1656" height="342" data-path="images/items/import-new-items-with-serial-numbers.png" />
        </Frame>
      </Step>

      <Step title="Update existing items">
        Keep the **same Item ID** but change values like condition, visibility, or status.\
        Example:

        <Frame type="glass">
          <img src="https://mintcdn.com/supercycle/XbKBsdX_PulItpyX/images/items/update-item-import.png?fit=max&auto=format&n=XbKBsdX_PulItpyX&q=85&s=c05e712391b4be530e0a7d5e39003cde" alt="Example CSV row for updating existing items" width="1654" height="296" data-path="images/items/update-item-import.png" />
        </Frame>
      </Step>

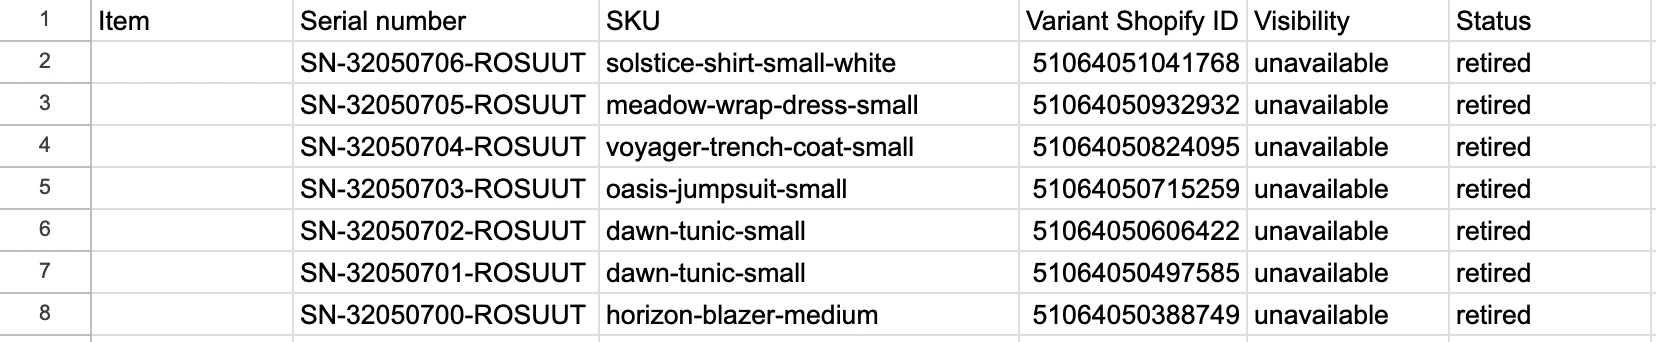
      <Step title="Deactivate items">
        The importer cannot delete items. To remove an item from circulation, set:

        <ul>
          <li>Visibility = <code>unavailable</code></li>
          <li>Status = <code>retired</code></li>
        </ul>

        Example:

        <Frame type="glass">
          <img src="https://mintcdn.com/supercycle/XbKBsdX_PulItpyX/images/items/retire-item-import.png?fit=max&auto=format&n=XbKBsdX_PulItpyX&q=85&s=edb7751fdbac3cc3cf63db0e72e274f1" alt="Example CSV row for deactivating items" width="1656" height="342" data-path="images/items/retire-item-import.png" />
        </Frame>
      </Step>

      <Step title="Upload the file">
        Import the completed CSV into Supercycle. Changes are applied immediately, and the store owner receives an email report showing how many items were added, how many were updated, and any failures.
      </Step>
    </Steps>

    ## Common mistakes

    * Leaving **Variant Shopify ID** and **SKU** blank → item cannot be linked.
    * Reusing an **Item ID** for a new unit → overwrites instead of creating.
  </Accordion>

  <Accordion title="Individually or in bulk, via Supercycle Scanner">
    You can create a new item by scanning a serial number with the [Supercycle Scanner](/documentation/manage/scanner/scanner).

    <AccordionGroup>
      <Accordion title="Single item">
        <Steps>
          <Step title="Scan a barcode, QR code or RFID tag">
            If the scanned serial number doesn't already exist in Supercycle, the **Create item** modal opens automatically.
          </Step>

          <Step title="Select a product">
            Press **Select a product** to load the full product list. Scroll or search to find the product and variant for the item you've scanned.
          </Step>

          <Step title="Select a status">
            Confirm the status for the new item (`Active`, `Draft`, `Retired`, `Sold`).
          </Step>

          <Step title="Create the item">
            Press **Create item** to finish adding the new item to your inventory.
          </Step>
        </Steps>

        After the item is created, Supercycle opens the item details page. From there, you can review and update additional info, such as the pick location.
      </Accordion>

      <Accordion title="In bulk, from a multi-scan session">
        When you're in a [multi-scan session](/documentation/manage/scanner/scanner#scan-modes) with a Zebra scanner, any unknown serials show as **Unknown tag** rows. You can turn them into items in one step:

        <Steps>
          <Step title="Press Create item in the bulk action bar">
            The count next to **Create item** shows how many unknown serials will be created.
          </Step>

          <Step title="Pick a product and status">
            The same product and status applies to every serial in the batch. The serials are listed read-only so you can confirm what you're creating.
          </Step>

          <Step title="Create the items">
            Press **Create items** to create them in one call. The multi-scan list automatically re-resolves the serials, so the rows flip from **Unknown** to **Matched** and become eligible for the other bulk actions.
          </Step>
        </Steps>
      </Accordion>
    </AccordionGroup>
  </Accordion>
</AccordionGroup>

***

### Make item unavailable

If there’s something wrong with an item and you need to stop future rentals from being placed on it temporarily, you can make it unavailable.
<Warning>Making an item unavailable won't remove its existing future rentals. You should go through its existing rentals and reassign them if necessary.</Warning>

<AccordionGroup>
  <Accordion title="From the Item">
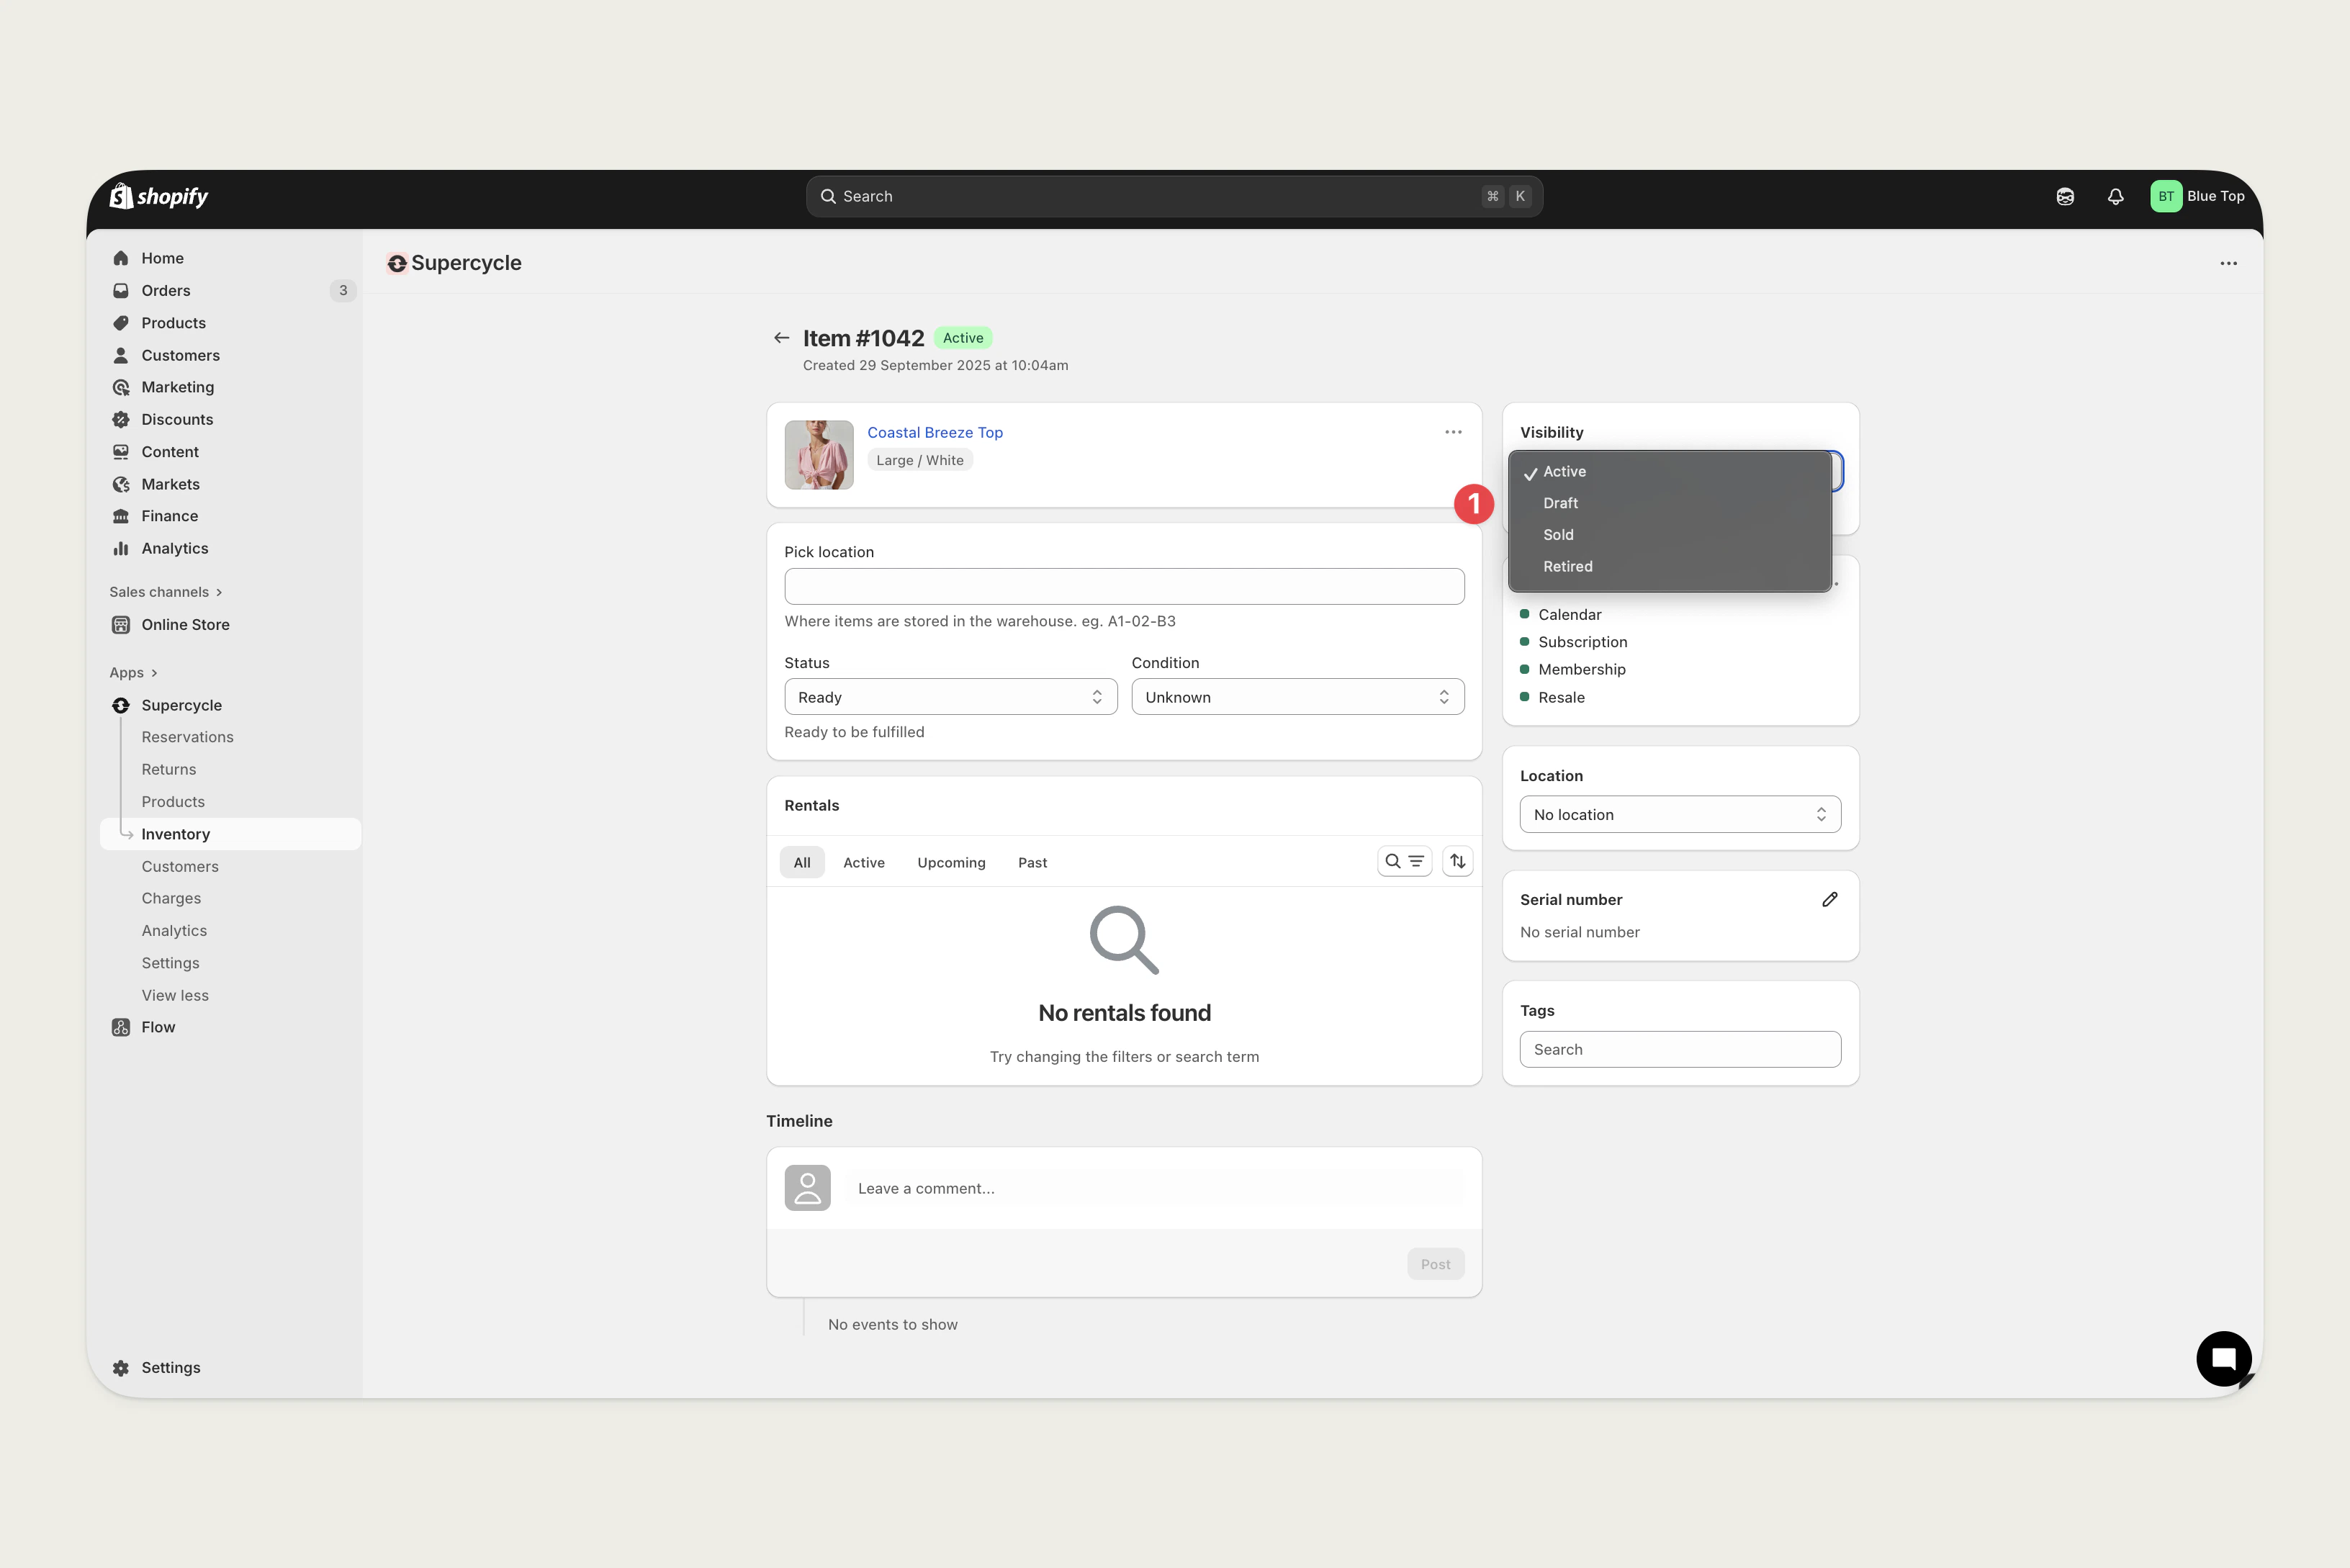
    Make item unavailable by changing the **Visibility** status <Icon icon="circle-1" iconType="solid" color="red" /> to **Draft**.

    <Frame type="glass">
      <img src="https://mintcdn.com/supercycle/XbKBsdX_PulItpyX/images/items/items-make-unavailable.png?fit=max&auto=format&n=XbKBsdX_PulItpyX&q=85&s=0d00e89295dfc860ba9703a258b38f40" width="3264" height="2178" data-path="images/items/items-make-unavailable.png" />
    </Frame>
  </Accordion>

  <Accordion title="Individually or in bulk, via Supercycle Scanner">
    Change an item's visibility status — `Active`, `Draft`, `Retired`, or `Sold` — from the scanner.

    <AccordionGroup>
      <Accordion title="Single item">
        From the item detail screen, tap the status dropdown and pick the new status.
      </Accordion>

      <Accordion title="In bulk, from a multi-scan session">
        From a [multi-scan session](/documentation/manage/scanner/scanner#scan-modes), press **Visibility** in the bulk action bar, pick the status, and apply — every selected item is updated in one call. See [Bulk actions](/documentation/manage/scanner/scanner-actions#bulk-actions).
      </Accordion>
    </AccordionGroup>
  </Accordion>
</AccordionGroup>

If you need to make an item permanently unavailable, you should [retire the item](documentation/manage/inventory/items#retire-items).

***

### Update blocked dates

Blocked dates take items, variants, or products out of availability for a specific period. You can change the **From** and **To** sides of those date ranges in bulk from the Blocked dates table.

<AccordionGroup>
  <Accordion title="In bulk, from the Blocked dates table">
    On the <Icon icon="shopify" iconType="solid" /> [Blocked dates](https://admin.shopify.com/apps/supercycle/unavailabilities) table, select the rows you want to change, then choose **Update blocked dates** from the **Actions** menu.

    In the modal, set a new **From** date, a new **To** date, or both:

    * **Set a value** to overwrite that side on every selected row.
    * **Leave a field empty** to clear that side on every selected row.
    * **Leave both fields empty** to clear both sides.

    Each side is applied independently, so you can update one side without affecting the other.

    <Note>Rental-typed blocked dates are managed from the rental and are skipped by this action.</Note>
  </Accordion>
</AccordionGroup>

***

### Delete items

If an item has no previous rentals on it, you can delete it. We recommend only using this for items created accidentally, as all of the item’s data will be permanently deleted (affecting analytics on stock utilization).

<AccordionGroup>
  <Accordion title="In bulk, from the Inventory table">
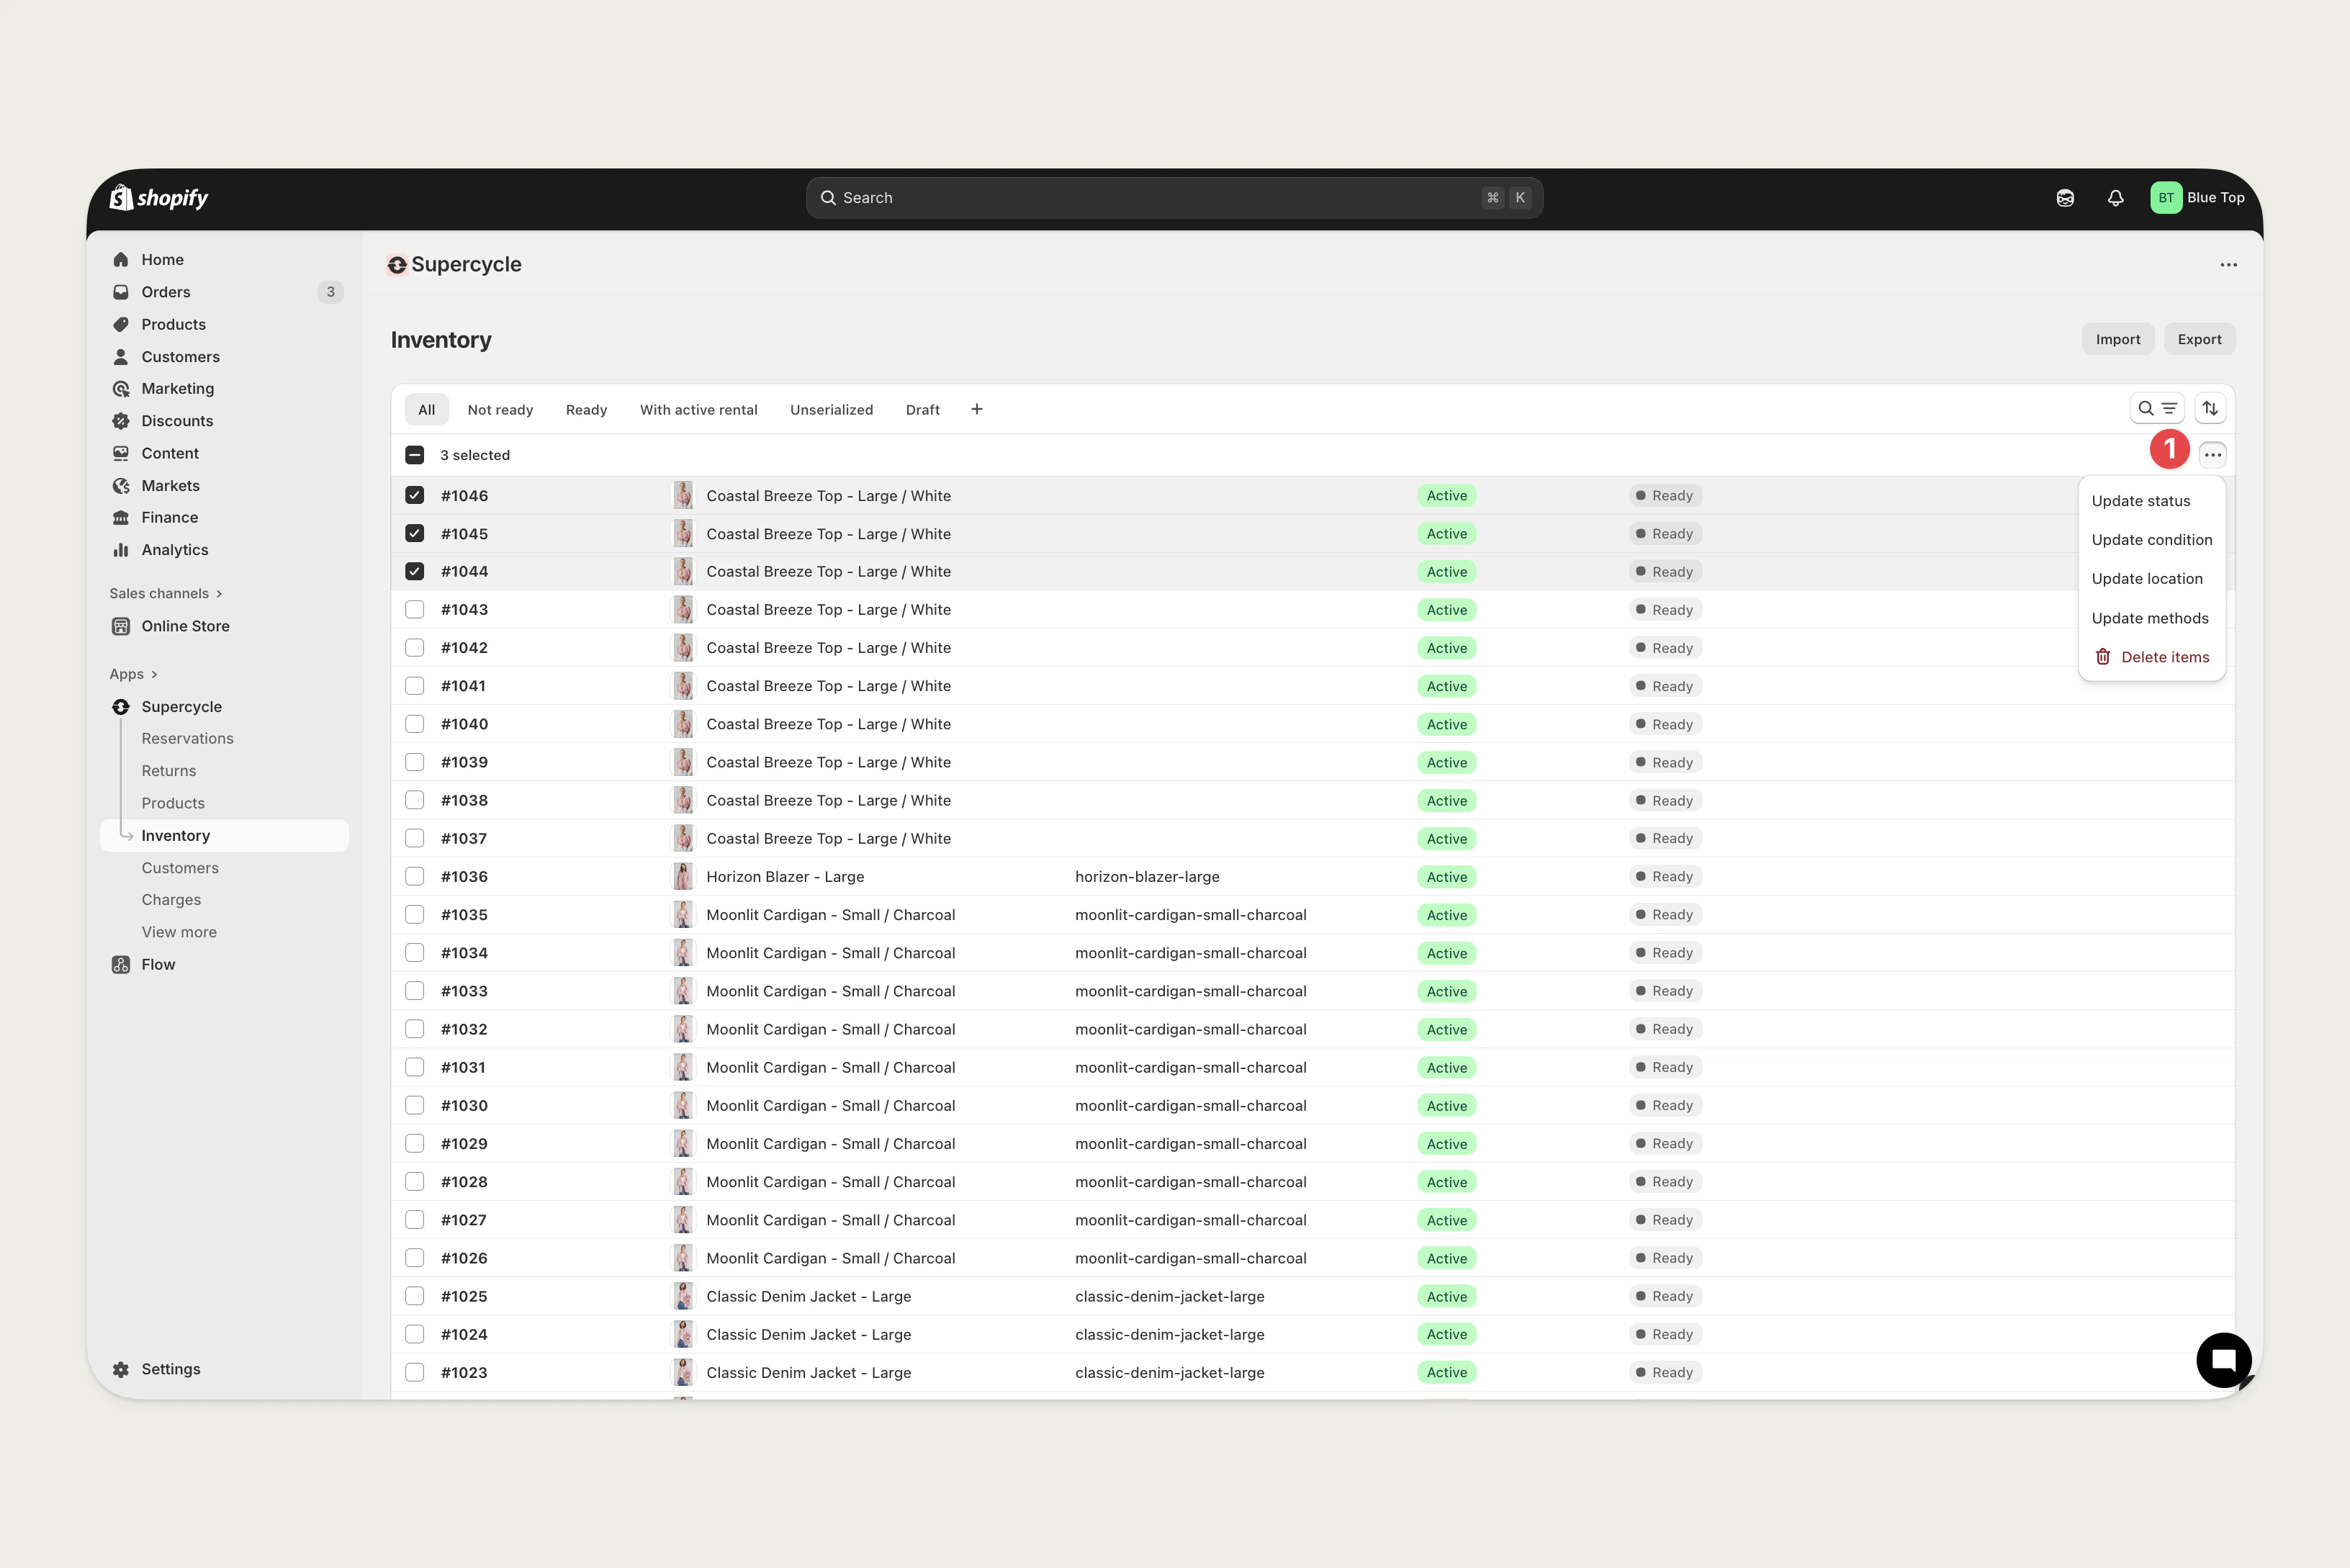
    **Delete items** action from the **Actions** <Icon icon="circle-1" iconType="solid" color="red" /> options on the <Icon icon="shopify" iconType="solid" /> [Inventory](https://admin.shopify.com/apps/supercycle/items) table.

    <Frame type="glass">
      <img src="https://mintcdn.com/supercycle/XbKBsdX_PulItpyX/images/items/items-inventory-actions.png?fit=max&auto=format&n=XbKBsdX_PulItpyX&q=85&s=d0e9a930cc9c3a0d3a79d0d01692f0f8" width="3264" height="2178" data-path="images/items/items-inventory-actions.png" />
    </Frame>
  </Accordion>
</AccordionGroup>

***

### Retire item

Retiring an item will prevent future rentals from being placed against it. Retiring can be reversed, although if you intend to remove an item from circulation temporarily we recommend making it unavailable instead.

<AccordionGroup>
  <Accordion title="From the Item">
    Retire item from the [Visibility](#visibility) <Icon icon="circle-1" iconType="solid" color="red" /> field.
  </Accordion>

  <Accordion title="Individually or in bulk, via Supercycle Scanner">
    Change an item's visibility status — `Active`, `Draft`, `Retired`, or `Sold` — from the scanner.

    <AccordionGroup>
      <Accordion title="Single item">
        From the item detail screen, tap the status dropdown and pick the new status.
      </Accordion>

      <Accordion title="In bulk, from a multi-scan session">
        From a [multi-scan session](/documentation/manage/scanner/scanner#scan-modes), press **Visibility** in the bulk action bar, pick the status, and apply — every selected item is updated in one call. See [Bulk actions](/documentation/manage/scanner/scanner-actions#bulk-actions).
      </Accordion>
    </AccordionGroup>
  </Accordion>
</AccordionGroup>

***

### Update item condition

<AccordionGroup>
  <Accordion title="From the Item">
    Update condition from the [Condition](#condition) <Icon icon="circle-3" iconType="solid" color="red" /> field.
  </Accordion>

  <Accordion title="In bulk, from the Inventory table">
    **Update condition** action from the **Actions** <Icon icon="circle-1" iconType="solid" color="red" /> options on the <Icon icon="shopify" iconType="solid" /> [Inventory](https://admin.shopify.com/apps/supercycle/items) table.

    <Frame type="glass">
      <img src="https://mintcdn.com/supercycle/XbKBsdX_PulItpyX/images/items/items-inventory-actions.png?fit=max&auto=format&n=XbKBsdX_PulItpyX&q=85&s=d0e9a930cc9c3a0d3a79d0d01692f0f8" width="3264" height="2178" data-path="images/items/items-inventory-actions.png" />
    </Frame>
  </Accordion>

  <Accordion title="In bulk, from the Cycles table">
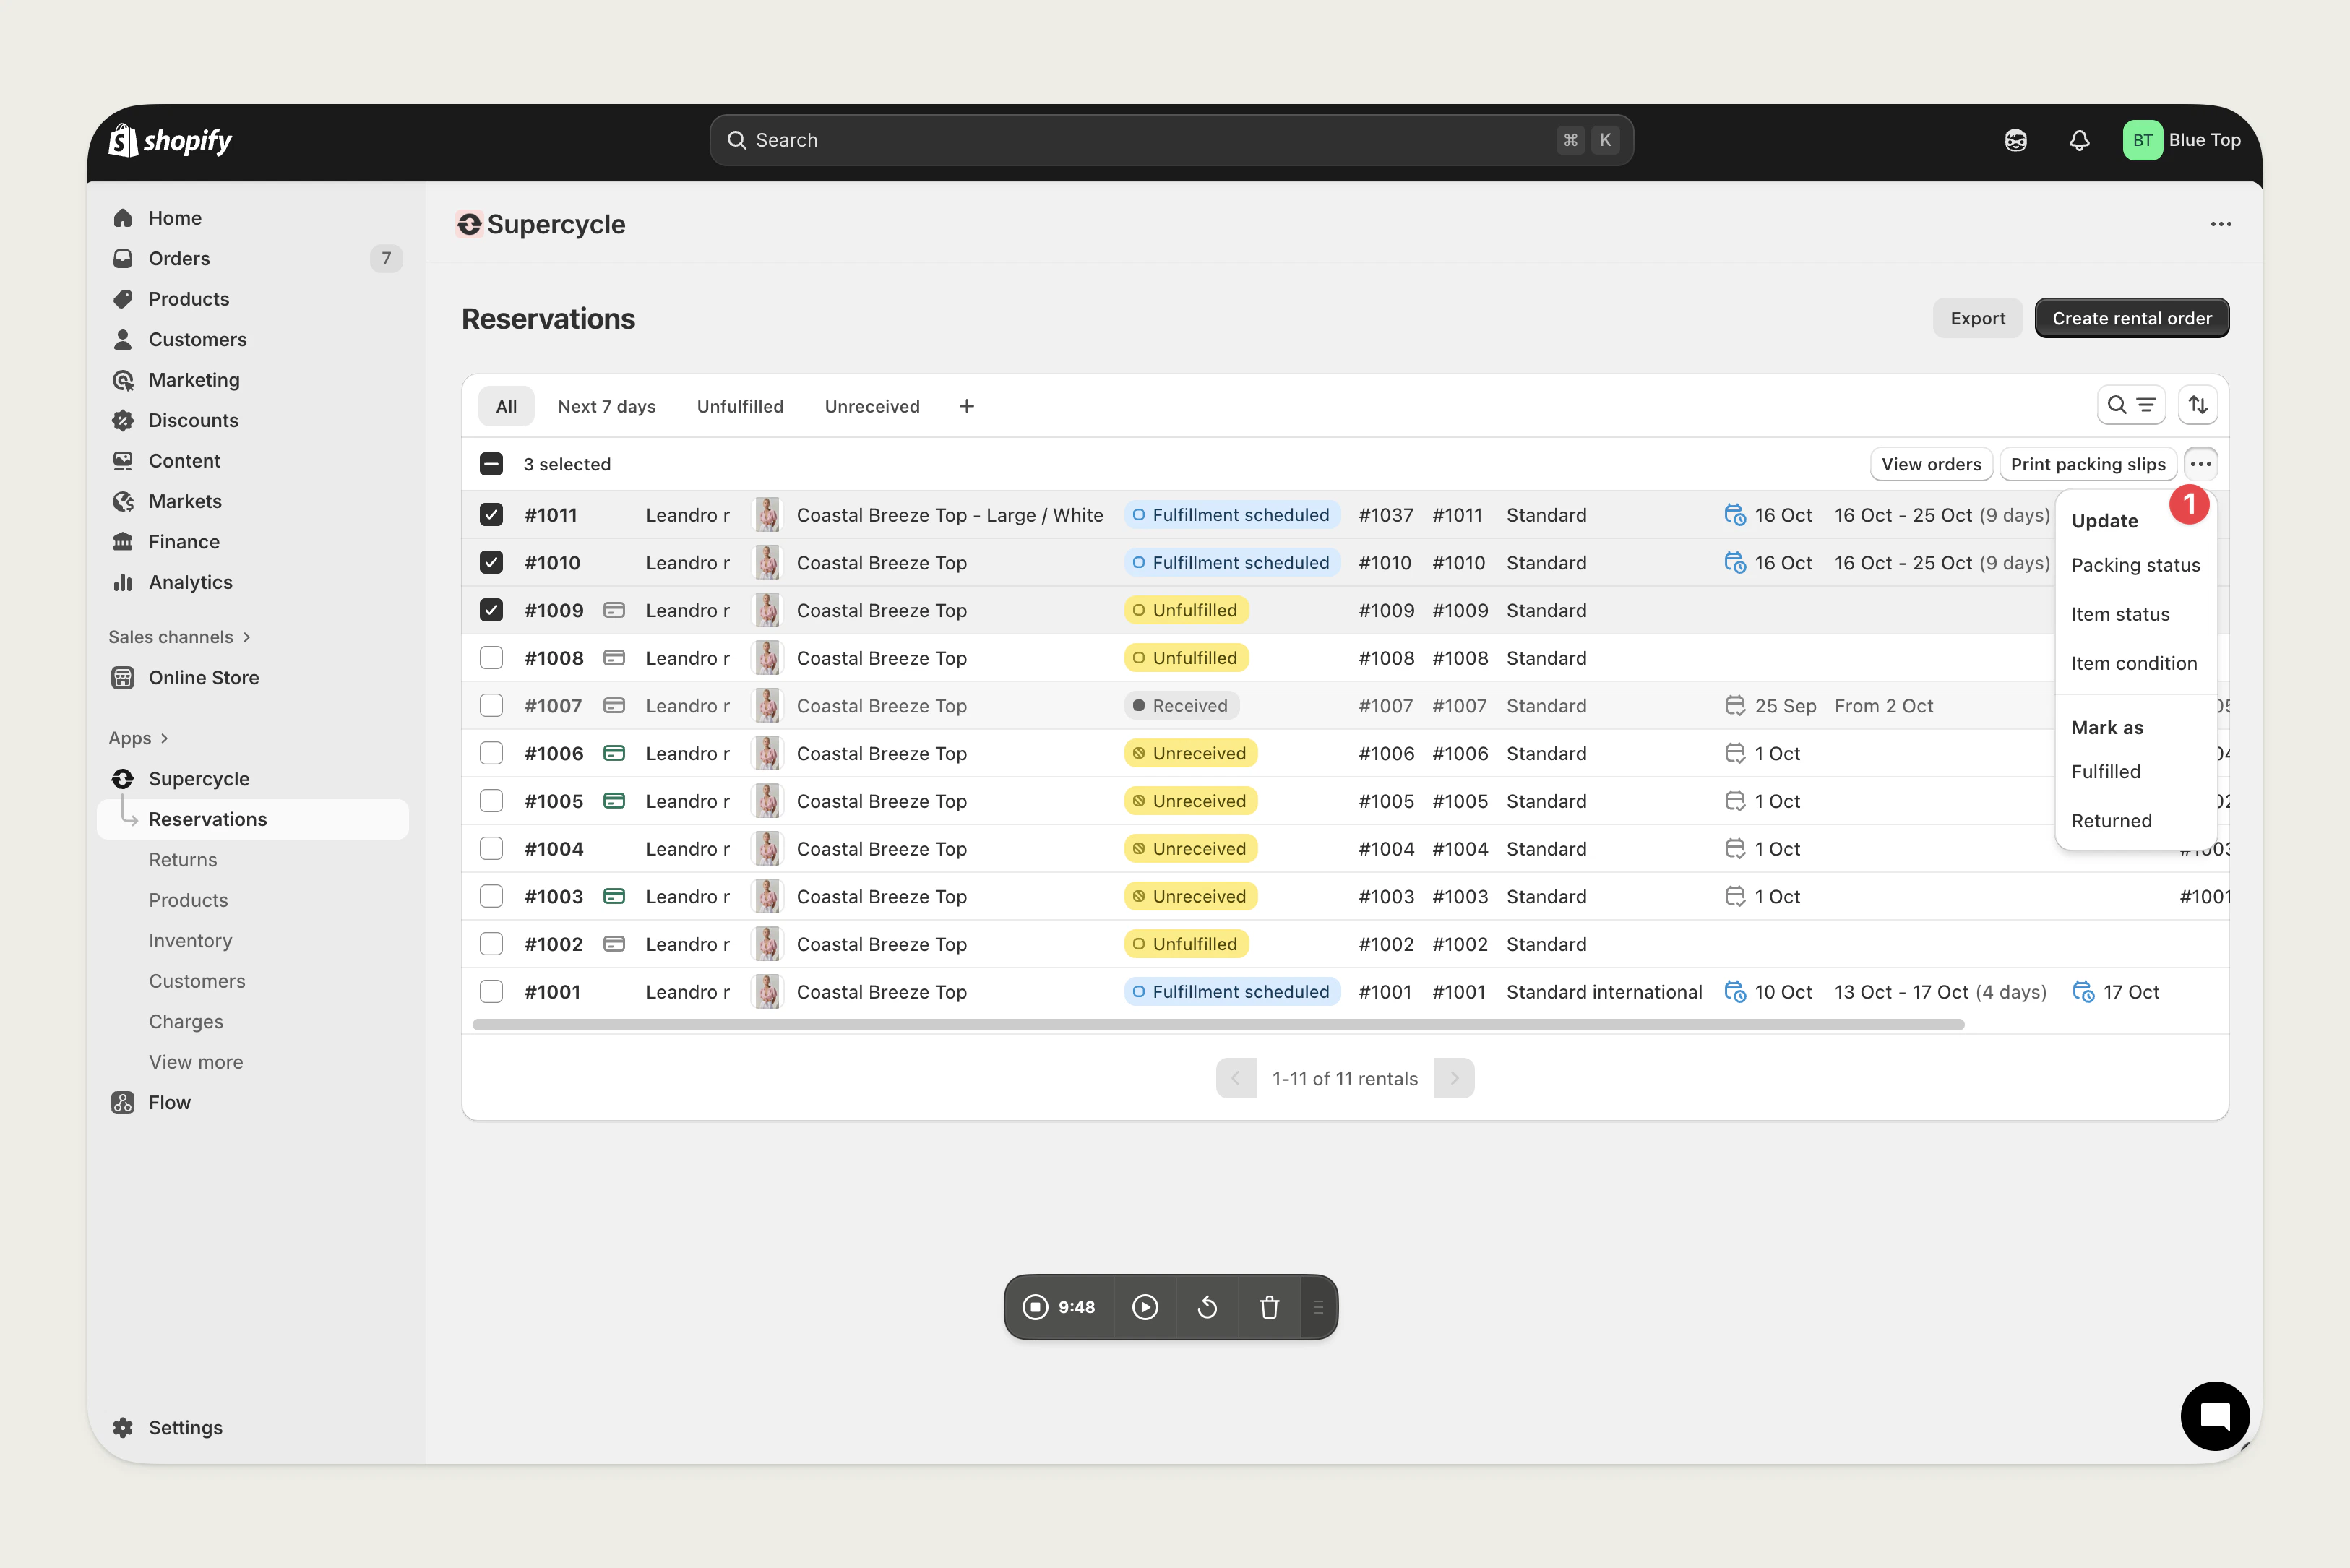
    **Update item condition** action from the **Actions** <Icon icon="circle-1" iconType="solid" color="red" /> options on the <Icon icon="shopify" iconType="solid" /> [Cycles](https://admin.shopify.com/apps/supercycle/rentals) table.

    <Frame type="glass">
      <img src="https://mintcdn.com/supercycle/XbKBsdX_PulItpyX/images/cycles/cycles-actions.png?fit=max&auto=format&n=XbKBsdX_PulItpyX&q=85&s=107f58e8e3643dbe6a4d1f7ee7e9506f" width="3252" height="2170" data-path="images/cycles/cycles-actions.png" />
    </Frame>
  </Accordion>
</AccordionGroup>

***

### Update item processing state

<AccordionGroup>
  <Accordion title="From the Item">
    Update processing state from the [Warehouse](#warehouse) <Icon icon="circle-2" iconType="solid" color="red" /> field.
  </Accordion>

  <Accordion title="In bulk, from the Inventory table">
    **Update status** action from the **Actions** <Icon icon="circle-1" iconType="solid" color="red" /> options on the <Icon icon="shopify" iconType="solid" /> [Inventory](https://admin.shopify.com/apps/supercycle/items) table.

    <Frame type="glass">
      <img src="https://mintcdn.com/supercycle/XbKBsdX_PulItpyX/images/items/items-inventory-actions.png?fit=max&auto=format&n=XbKBsdX_PulItpyX&q=85&s=d0e9a930cc9c3a0d3a79d0d01692f0f8" width="3264" height="2178" data-path="images/items/items-inventory-actions.png" />
    </Frame>
  </Accordion>

  <Accordion title="In bulk, from the Cycles table">
    **Update item status** action from the **Actions** <Icon icon="circle-1" iconType="solid" color="red" /> options on the <Icon icon="shopify" iconType="solid" /> [Cycles](https://admin.shopify.com/apps/supercycle/rentals) table.

    <Frame type="glass">
      <img src="https://mintcdn.com/supercycle/XbKBsdX_PulItpyX/images/cycles/cycles-actions.png?fit=max&auto=format&n=XbKBsdX_PulItpyX&q=85&s=107f58e8e3643dbe6a4d1f7ee7e9506f" width="3252" height="2170" data-path="images/cycles/cycles-actions.png" />
    </Frame>
  </Accordion>
</AccordionGroup>

***

### Update item warehouse location

<AccordionGroup>
  <Accordion title="From the Item">
    Update location from the [Location](#location) <Icon icon="circle-4" iconType="solid" color="red" /> field.
  </Accordion>

  <Accordion title="In bulk, from the Inventory table">
    **Update location** action from the **Actions** <Icon icon="circle-1" iconType="solid" color="red" /> options on the <Icon icon="shopify" iconType="solid" /> [Inventory](https://admin.shopify.com/apps/supercycle/items) table.

    <Frame type="glass">
      <img src="https://mintcdn.com/supercycle/XbKBsdX_PulItpyX/images/items/items-inventory-actions.png?fit=max&auto=format&n=XbKBsdX_PulItpyX&q=85&s=d0e9a930cc9c3a0d3a79d0d01692f0f8" width="3264" height="2178" data-path="images/items/items-inventory-actions.png" />
    </Frame>
  </Accordion>

  <Accordion title="Individually or in bulk, via Supercycle Scanner">
    Move items between warehouses directly from the scanner.

    <AccordionGroup>
      <Accordion title="Single item">
        From the item detail screen, press the warehouse row to open the warehouse picker, choose the destination, then press **Save changes**.
      </Accordion>

      <Accordion title="In bulk, from a multi-scan session">
        From a [multi-scan session](/documentation/manage/scanner/scanner#scan-modes), press **Warehouse** in the bulk action bar, pick the destination warehouse, and apply — every selected item is moved in one call. See [Bulk actions](/documentation/manage/scanner/scanner-actions#bulk-actions).
      </Accordion>
    </AccordionGroup>
  </Accordion>
</AccordionGroup>

***

### Update item tags

<AccordionGroup>
  <Accordion title="From the Item">
    Update tags from the [Tags](#tags) <Icon icon="circle-7" iconType="solid" color="red" /> field.
  </Accordion>

  <Accordion title="Via the MCP">
    Use the [`add_tag`](/ai/operators-mcp/tools#tags) or [`remove_tag`](/ai/operators-mcp/tools#tags) tool with:

    * `resource_type` - `item`
    * `resource_id` - Item ID (e.g. `#1042`)
    * `tag` - Tag title to add or remove
  </Accordion>

  <Accordion title="Via the API">
    Use the [Update an item](/api-reference/admin/items/update-an-item) endpoint with the `tagsAttributes` parameter.
  </Accordion>
</AccordionGroup>

***

### Update item product

You can reassign one or more items to a different product/variant. This is useful when items have been mis-tagged against the wrong product, when a product has been split or merged in Shopify, or when you want to consolidate items under a single canonical variant.

When you change the variant on an item, the underlying product link is updated automatically — the product is derived from the chosen variant, so you only need to pick the variant. Affected products are re-ingested so their availability and inventory counts stay in sync.

<AccordionGroup>
  <Accordion title="From the Item">
    Update the variant from the [Variant](#variant) field on the item's page. The product is updated automatically to match the chosen variant.
  </Accordion>

  <Accordion title="In bulk, from the Inventory table">
    **Update product** action from the **Actions** <Icon icon="circle-1" iconType="solid" color="red" /> options on the <Icon icon="shopify" iconType="solid" /> [Inventory](https://admin.shopify.com/apps/supercycle/items) table.

    <Frame type="glass">
      <img src="https://mintcdn.com/supercycle/XbKBsdX_PulItpyX/images/items/items-inventory-actions.png?fit=max&auto=format&n=XbKBsdX_PulItpyX&q=85&s=d0e9a930cc9c3a0d3a79d0d01692f0f8" width="3264" height="2178" data-path="images/items/items-inventory-actions.png" />
    </Frame>

    <Steps>
      <Step title="Select items">
        Tick the items you want to reassign in the Inventory table.
      </Step>

      <Step title="Choose Update product">
        Open the **Actions** menu and select **Update product**.
      </Step>

      <Step title="Pick a variant">
        Search for a product in the variant picker and choose the target variant. The modal previews the product image, product title, variant title, and SKU so you can confirm you've selected the right one before saving.
      </Step>

      <Step title="Save">
        Save to assign that variant to every selected item. The product link on each item is derived from the variant automatically, and the affected products are re-ingested. Your selection is cleared once the update completes.
      </Step>
    </Steps>
  </Accordion>
</AccordionGroup>

***